
This guide outlines the instructions to restore your Time Machine backup from Backblaze B2 using an external USB Hard Drive that you have purchased from Backblaze. This USB Hard Drive contains a "snapshot" of your Time Machine backup. The cost of the USB Hard Drive containing your Time Machine backup is $189 and includes FedEx shipping to your location. All USB orders are prepared and shipped from the U.S., even if your data is stored in a non-U.S. data center. This document assumes you have previously had your Time Machine backup stored on a Synology NAS device and then synced to Backblaze B2 using the process described in the companion Guide, "How to backup your Time Machine backup to Synology and B2"
The process described is not the only method to restore your Time Machine backup. For example, you could restore directly from the Synology NAS device or download the Time Machine backup from B2 to your Mac and run Apple's Migration Assistant. These options are outside the scope of this guide. Please contact Apple or Synology as needed if you wish to try these other options.
This guide assumes you have the following:
- A Mac computer with MacOS 10.9 and above.
- Your Apple ID and password.
- Working knowledge of the Time Machine backup service on your Mac.
- A Backblaze B2 Cloud Storage account and the login credentials for that account.
NOTE: The set-up process below is 29 steps. Please follow the steps in order. There will be breaks between Steps 2 and 3 and Steps 4 and 5 as the "restore" is prepared and shipped to your home or office. Once you start with Step 5, you should expect to continue until the end of the process.
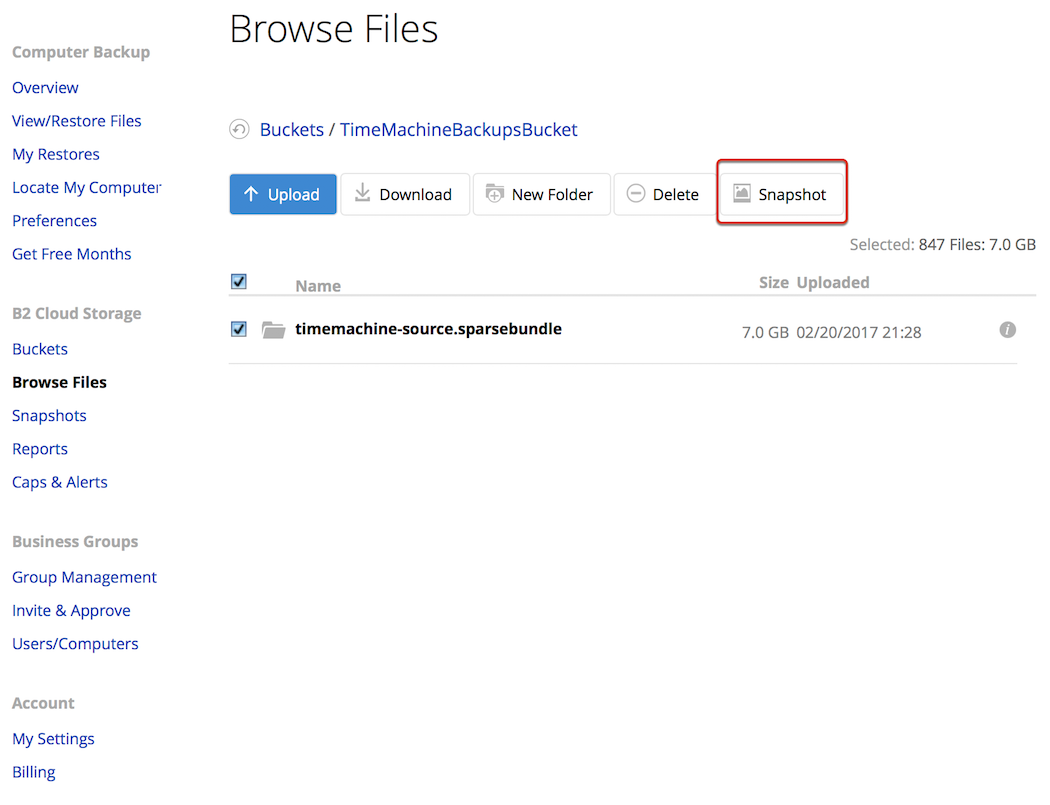
STEP 1 - Locate the Time Machine backup (.sparsebundle) file on B2
- On any computer with a web browser, log in to your Backblaze B2 account.
- Select "Browse Files" for the bucket containing the Time Machine backup.
- Locate the Time Machine backup ".sparsebundle" file. You may have to navigate through the folder structure to locate this file.
- Select the ".sparsebundle" file.
- Click the "Snapshot" button as shown below.
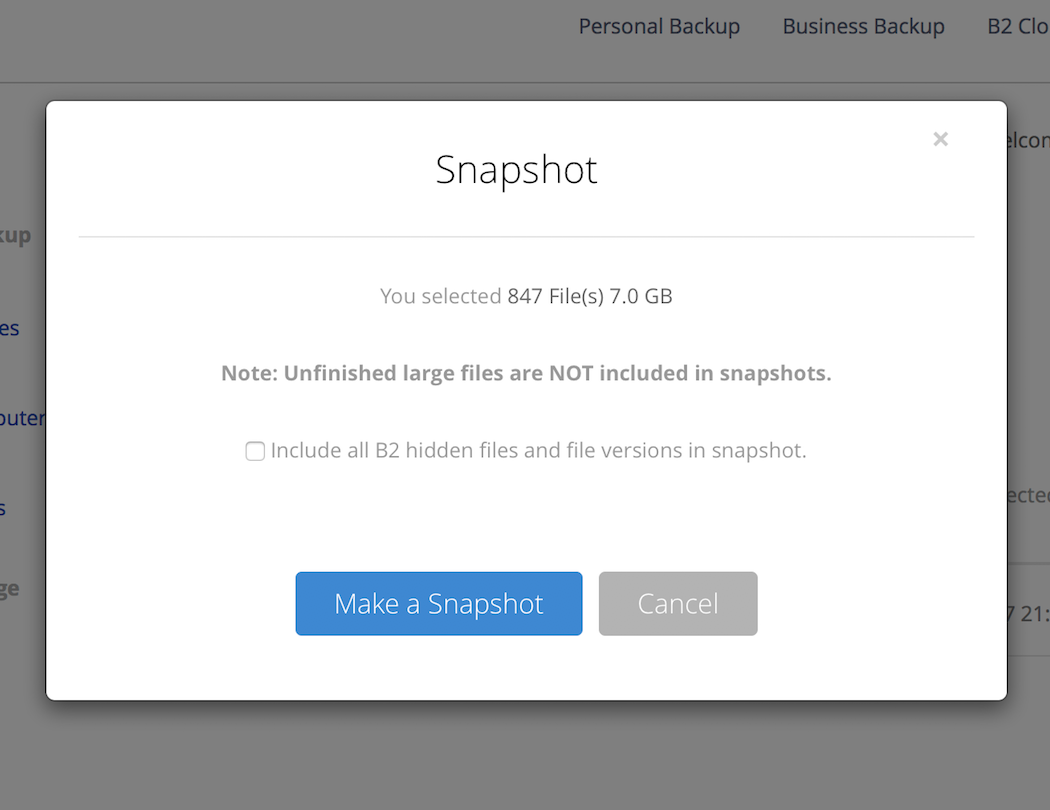
STEP 2 - "Make a Snapshot" of the Time Machine backup
After pressing "Snapshot", you'll see a screen similar to the one below.
- Make sure that the "Include all B2 hidden files..." box is NOT checked.
- Press "Make a Snapshot" when ready.
NOTE: B2 will now create the Snapshot. This can take a few minutes to a day or longer depending on the size of the file. You can log out of the B2 account. You will be notified by email, sent to your Backblaze B2 email account, when the Snapshot is ready.
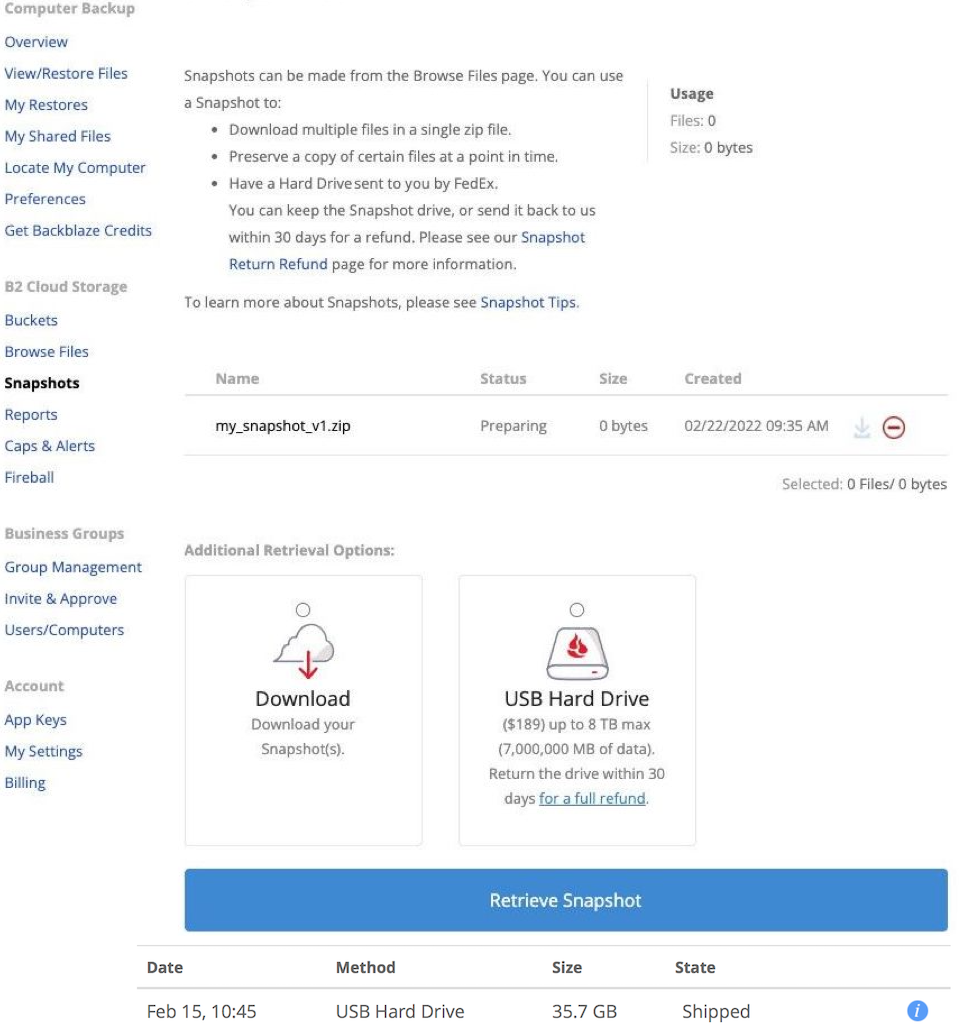
STEP 3 - Retrieve the completed Snapshot
Once the Time Machine backup Snapshot has finished it will show up on the list as shown below.
- Log in to your Backblaze B2 account.
- Navigate to the "Snapshots" page.
- Select the Snapshot you wish to retrieve.
- Select the "USB Hard Drive" retrieval option.
- Press "Retrieve Snapshot"
NOTE: Optionally, you can download the Snapshot file at this point versus ordering a USB hard drive. Typically, Time Machine backup files are very large and can require a long time to download. If you do download the Snapshot, then once the file is properly downloaded to your "new" Mac, you can skip to Step 20 in this process.
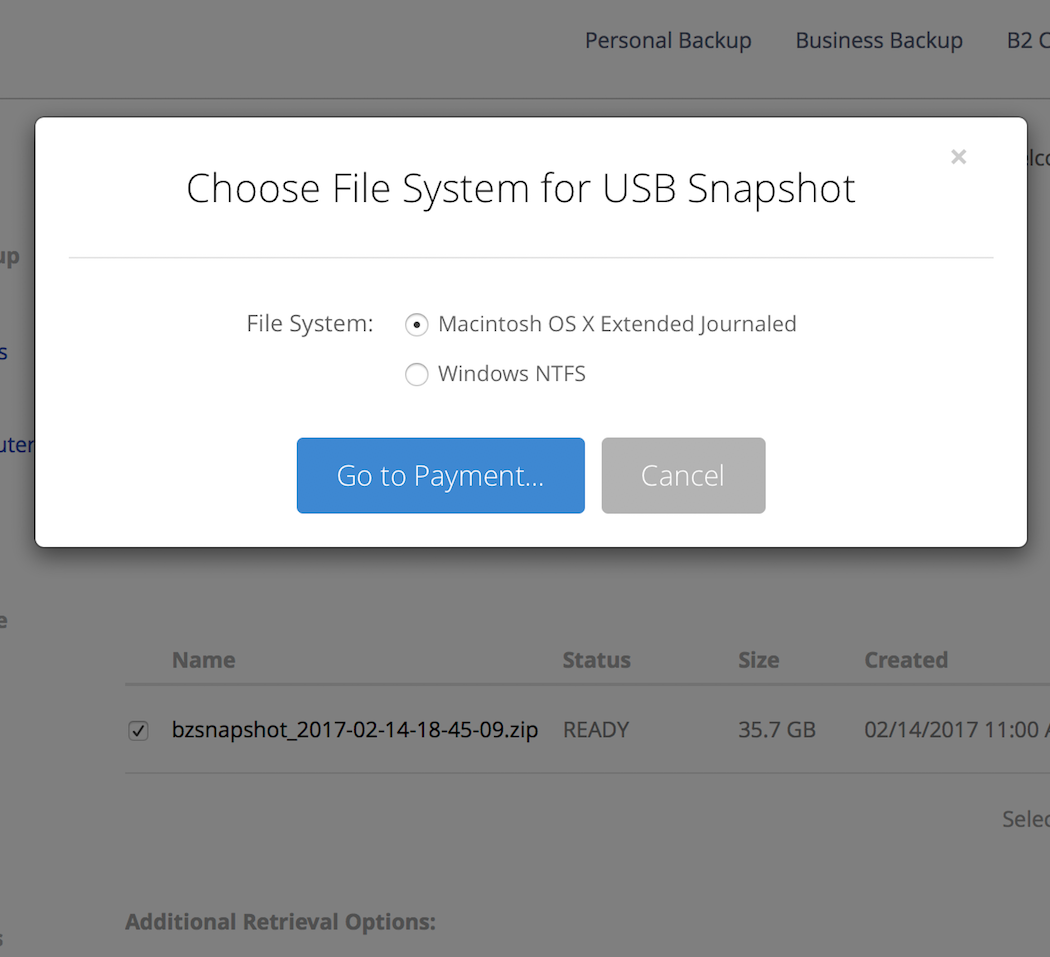
STEP 4 - Choose the File System and pay for the USB Snapshot
After selecting "Retrieve Snapshot" you will see a screen similar to the following:
- Make sure the "Macintosh OS X Extended Journaled" option is selected
- Press "Go to Payment..."
- Enter your Payment information
- Enter your Billing and Shipping information
- Process the payment
- Log out of Backblaze B2
NOTE: The Snapshot will be encrypted, loaded on the USB Hard Drive, and shipped to the address you provide. Once the USB Hard Drive arrives you can go on to the next step.
STEP 5 - Restoring to your "new" Mac
NOTE: This section demonstrates how to restore your Time Machine backup to a new Mac or to a Mac with a new hard drive. Once you start this process, you should expect it to take a hour or longer.
- Start your new Mac
- During the initialization process you will see a screen like the one below
- Select "Don't transfer any information now"
- Press "Continue"

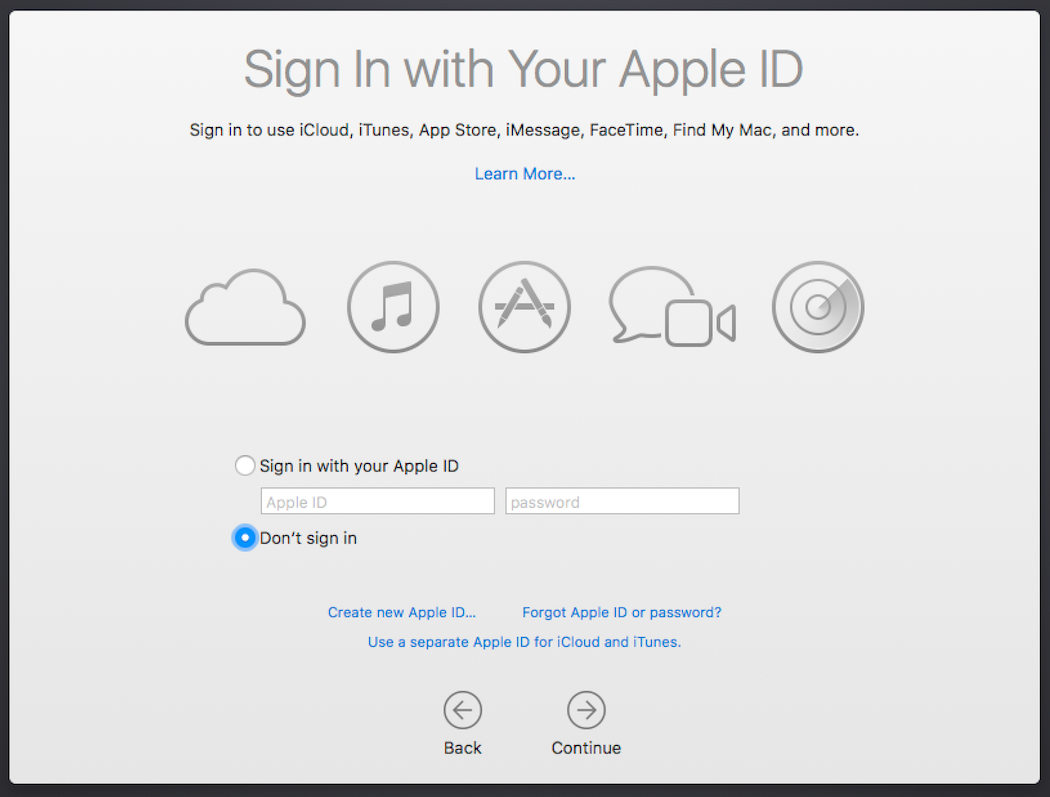
STEP 6 - Don't Sign In Yet
- The "Sign In" screen below appears
- If necessary, select the "Don't sign in" option
- Press "Continue"
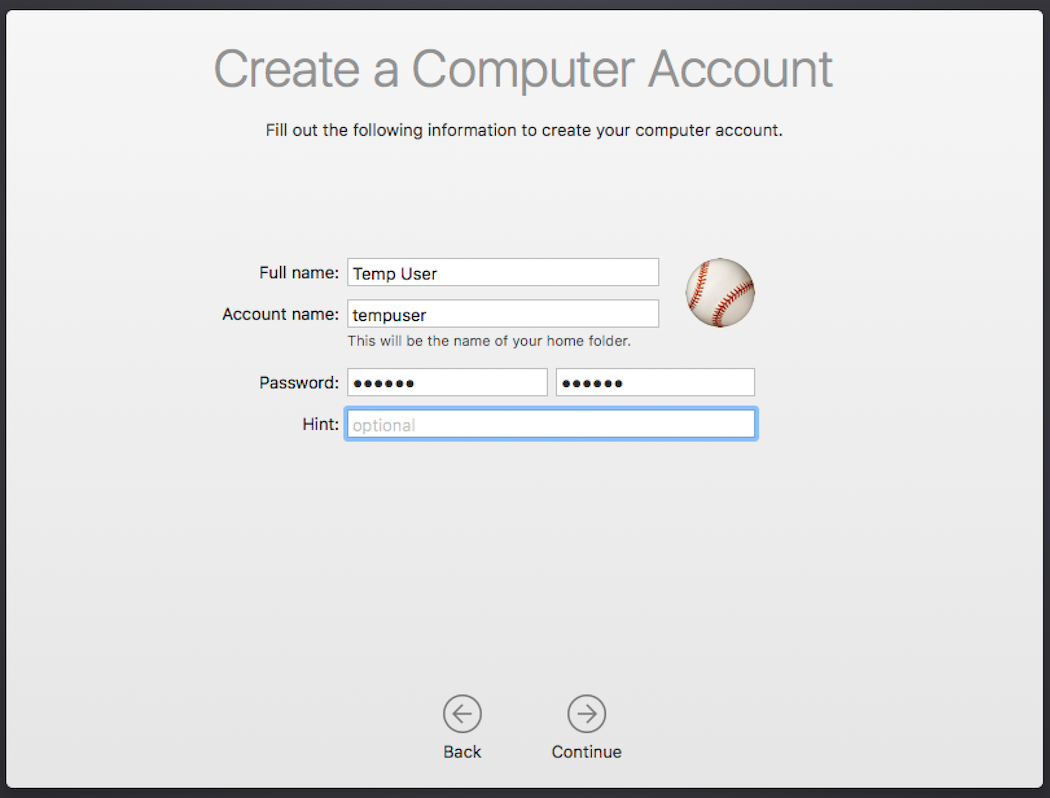
STEP 7 - Create a Temporary User Account
NOTE: For the restore you will create a temporary account which you will delete later in this process.
- The "Create a Computer Account" screen below appears.
- Fill out the form as needed, keep it simple, this is a temporary account.
- Record the account information as you will need it later in the process.
- Press "Continue".
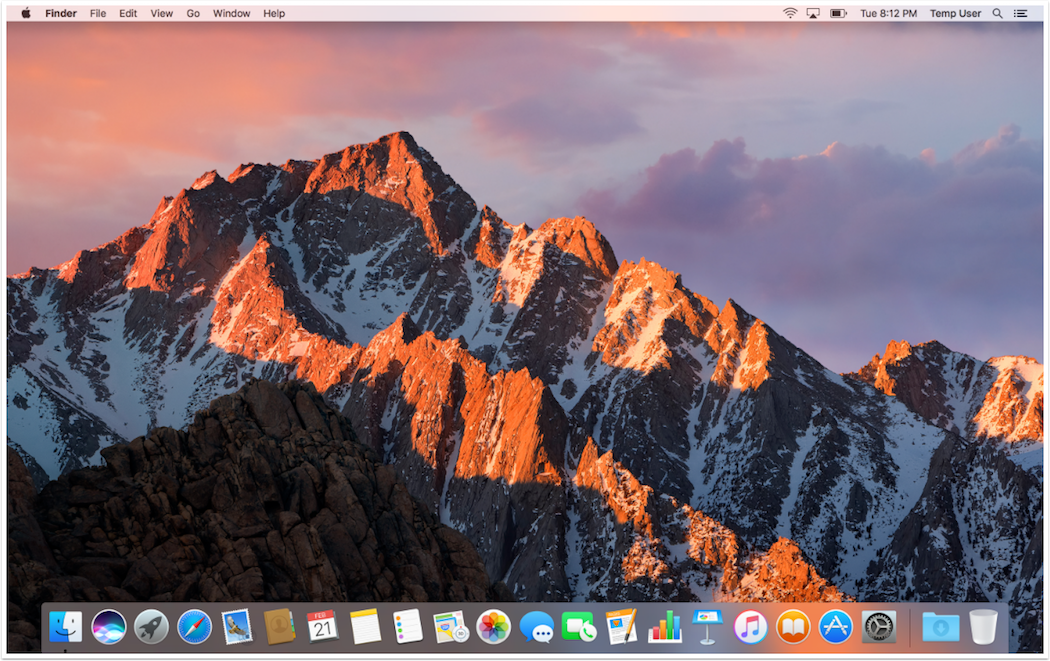
STEP 8 - Initial installation is complete
- The installation is complete and "Temp User" is logged in.
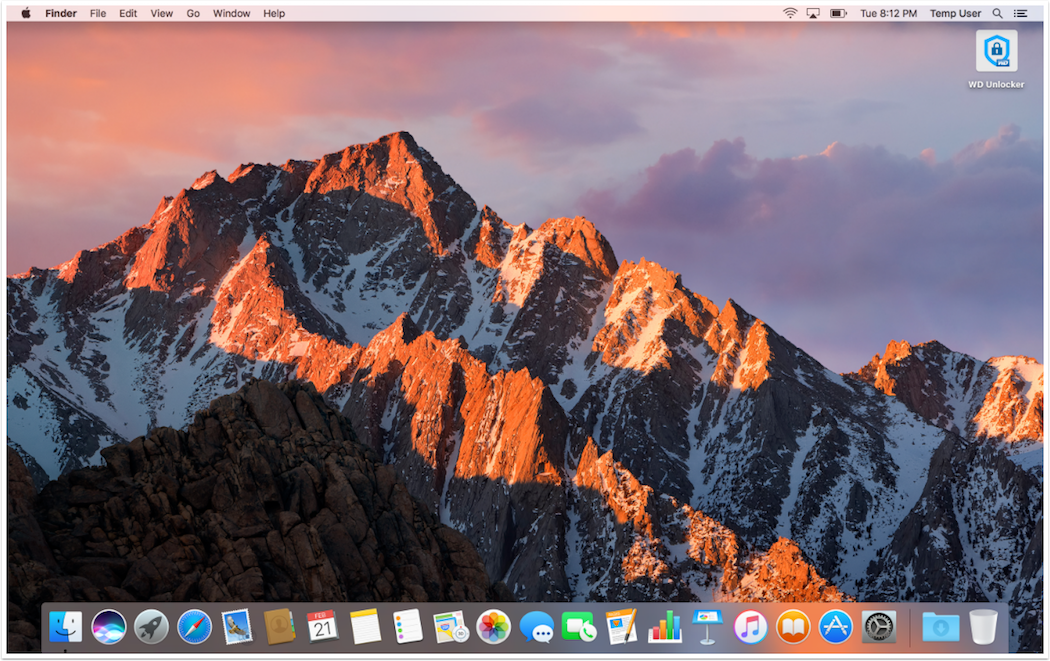
STEP 9 - Connect the USB Hard Drive
- Once you are logged in, connect the Backblaze USB Hard Drive to the Mac
- Once connected the "WD Unlocker" folder icon will appear in the upper right of the screen.
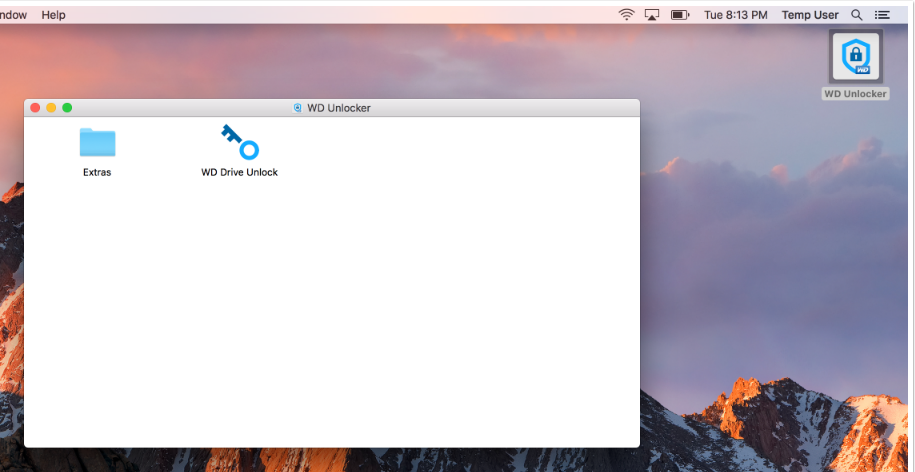
STEP 10 - Locate the WD Drive Unlock application
NOTE: The USB Hard Drive containing your Time Machine backup is encrypted by Backblaze before it is shipped. The next few of steps outline how to decrypt the drive so it can be restored.
- Double-click the "WD Unlocker" icon to open the "WD Unlocker" folder
- You should see a screen similar to the following
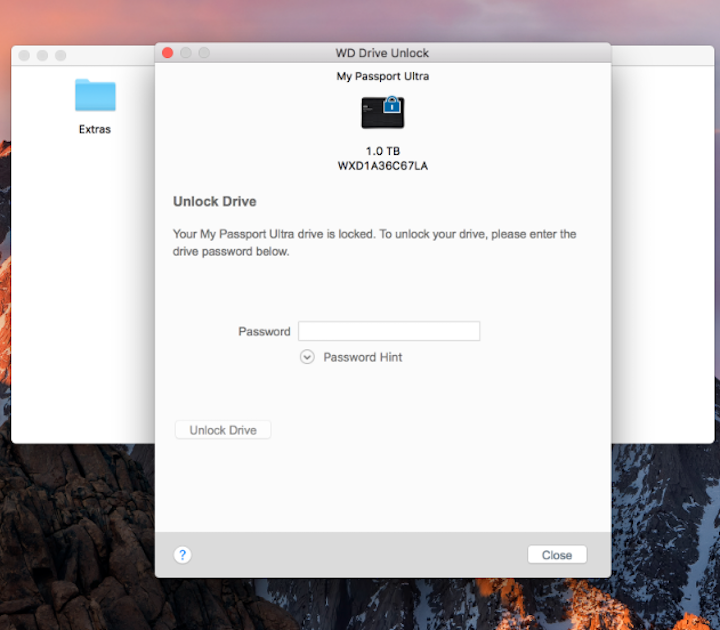
STEP 11 - Run the WD Drive Unlock application
- Double-click (run) the "WD Drive Unlock" application
- You should see a screen similar to the following asking for a password
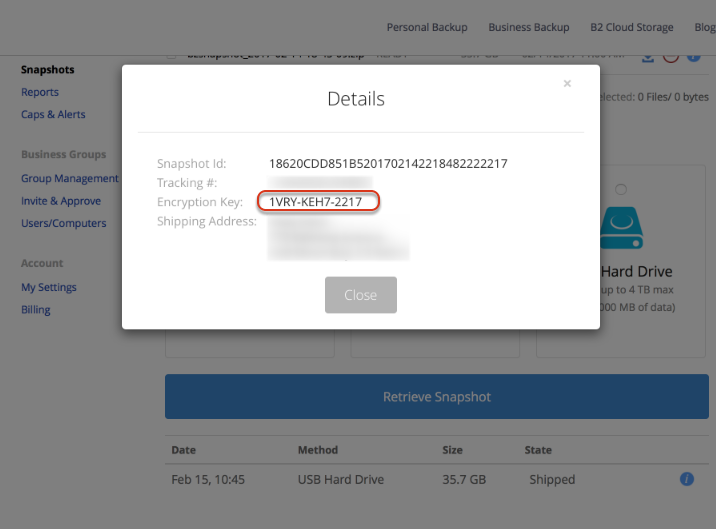
STEP 12 - Retrieve the Drive Encryption Key from your B2 Account
NOTE: You will need to have network connectivity on your Mac to log into the Backblaze B2 account. If that is not possible at this time, you can use a second computer to retrieve the needed information.
- In a web browser, navigate to backblaze.com and sign in to your B2 account.
- Go to the "Snapshot" page.
- Locate the USB Snapshot you are working with. Snapshots are listed near the bottom of the page, below the "Retrieve Snapshot" button.
- For the USB Snapshot file, locate the information ("i") icon to the right.
- Click on the information icon and you will see a screen similar to the one below.
- Locate and then copy the "Encryption Key", you key will be different than the one shown below.
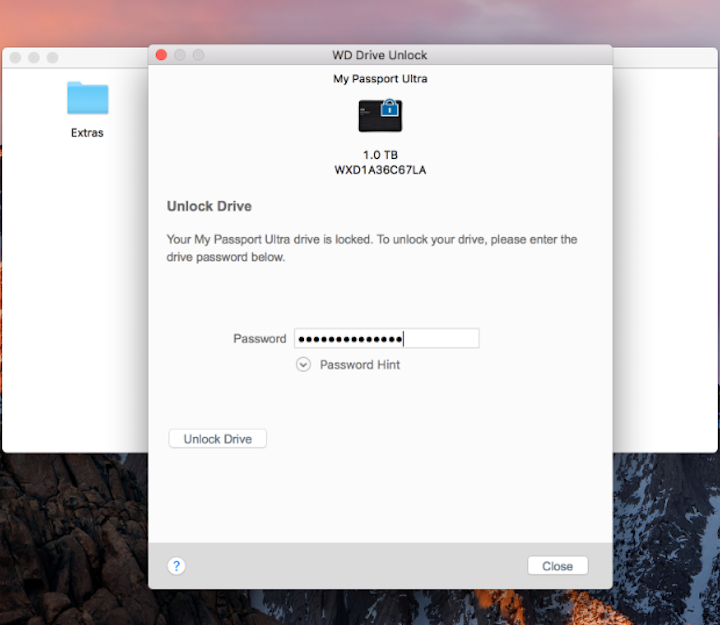
STEP 13 - Enter the Encryption Key
- Return back to the WD Drive Unlock application.
- Paste or enter the Encryption Key into the password field as shown below.
- Click "Unlock Drive".
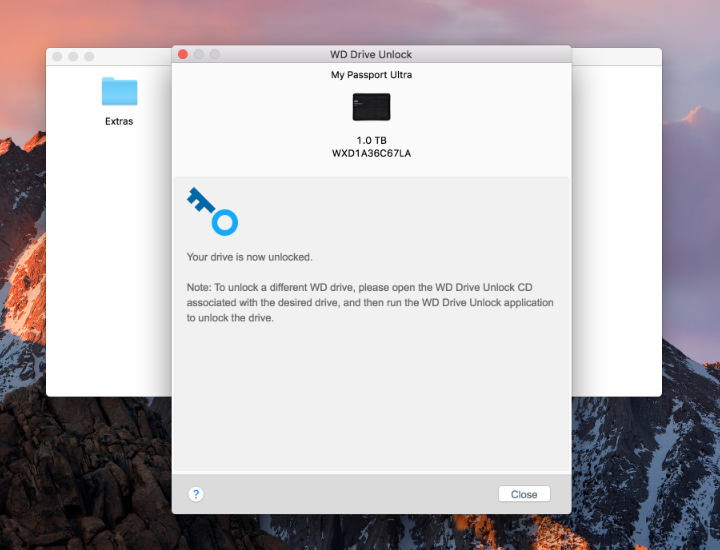
STEP 14 - The USB Drive is Unlocked
- If the Encryption Key entered is correct, you should see a screen similar to the one below. If the "Unlock" fails, please check the Encryption Key and try again.
- If the USB Drive is successfully unlocked, then you can:
- Log out of the Backblaze B2 session opened in Step 12.
- Select "Close" on this screen to continue.
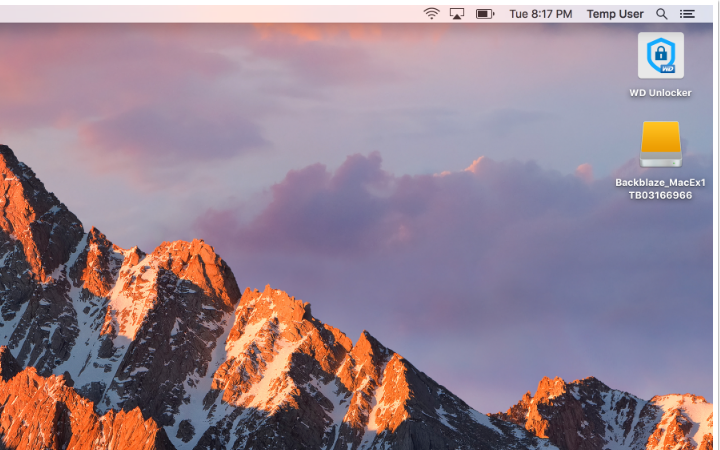
STEP 15 - The USB Hard Drive is Ready
- Notice that the USB Hard Drive from Backblaze will appear on the desktop. It is ready to use.
- Double-click on the USB Hard Drive to display the contents.
STEP 16 - Locate the Time Machine backup on the USB Hard Drive
NOTE: The Time Machine Backup file will be named after the computer you backed up and end with ".sparsebundle".
- Navigate through the folders on the USB Hard Drive to locate the Time Machine backup file.
- Double-click on the .sparsebundle file. NOTE: Nothing will appear to happen when you click on the file, but the .sparsebundle file has been opened and is available for restore.
- Continue to the next step.

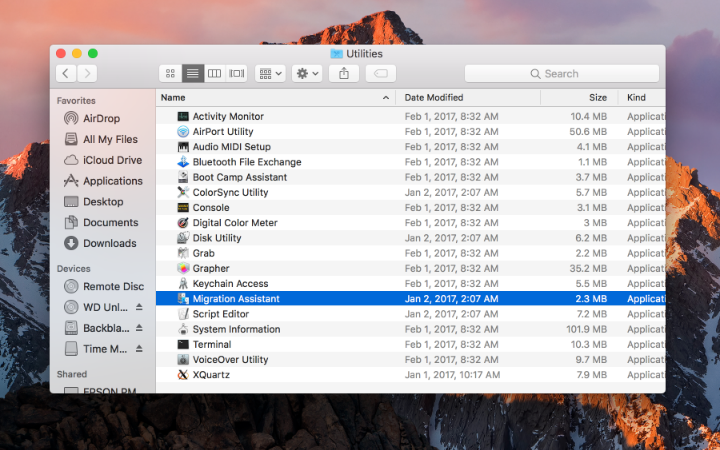
STEP 17 - Open Migration Assistant
- From the "Apple" Menu, select Go >> Applications.
- In the Applications folder open the Utilities folder
- Double-click on Migration Assistant
STEP 18 - Migration Assistant Starts Up
- The Migration Assistant starts and a screen similar to the one below appears.
- Click "Continue".

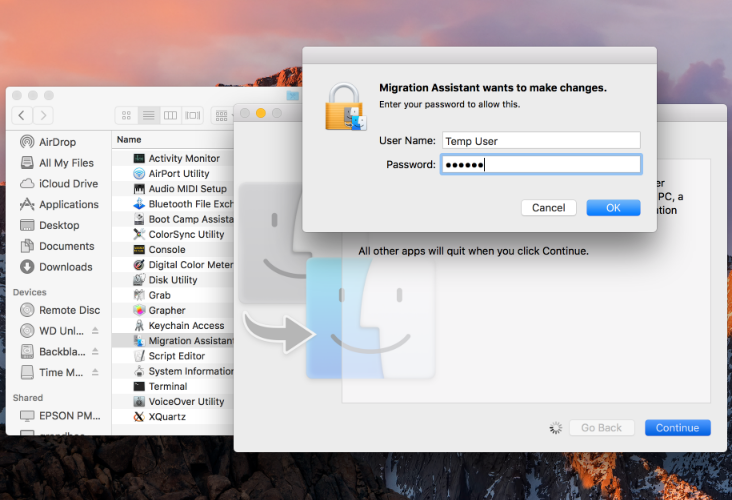
STEP 19 - Approve Migration Assistant to Run
- Enter the account information for the temporary account you created back in Step 7.
- Click "OK".
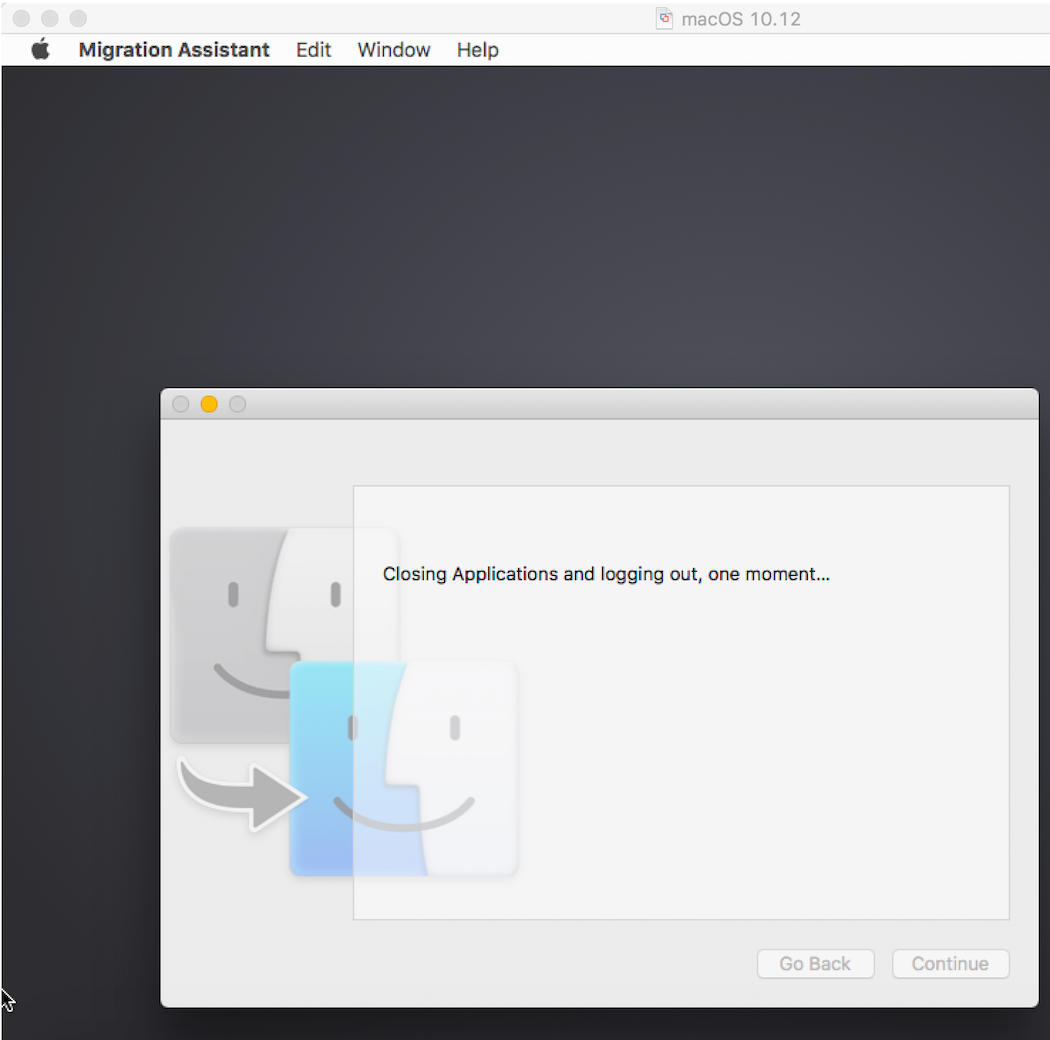
STEP 20 - Migration Assistant Starts
- Migration Assistant will close any open applications on your Mac and log you out.
- Migration Assistant will be the only application running on your Mac.
- Click "Continue" if needed (Migration Assistant may proceed without you clicking continue).
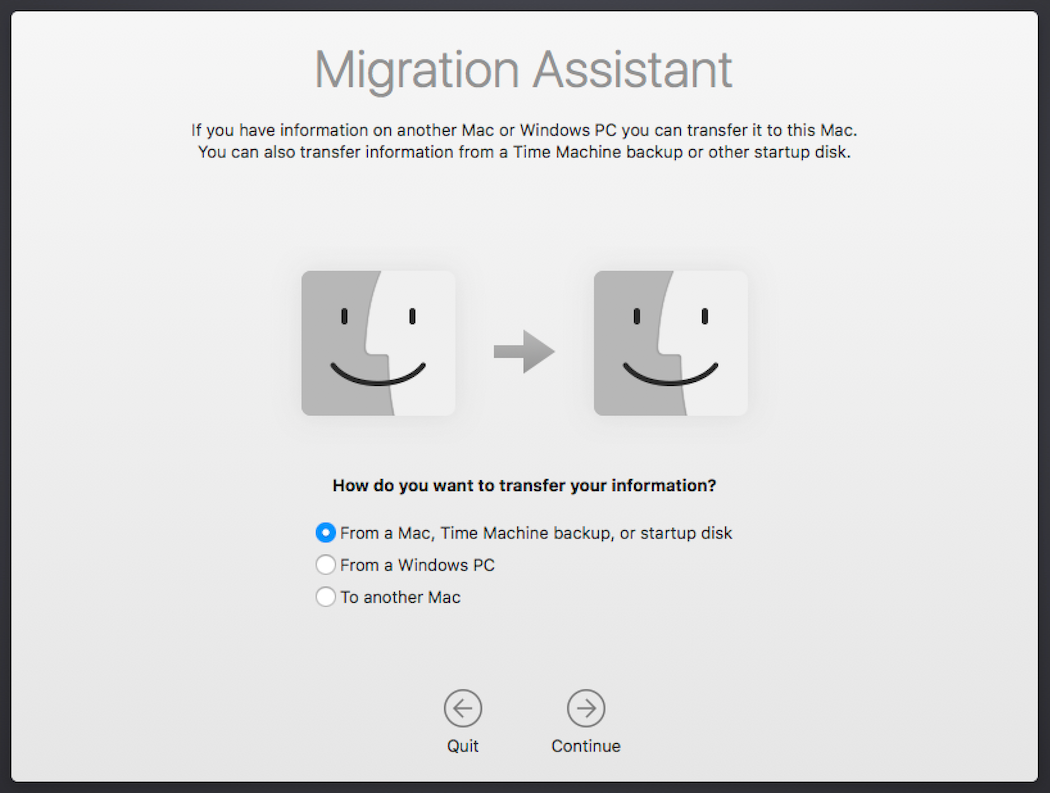
STEP 21 - Pick the Restore Source
- Ensure that "From a Mac, Time Machine..." is selected.
- Press "Continue".
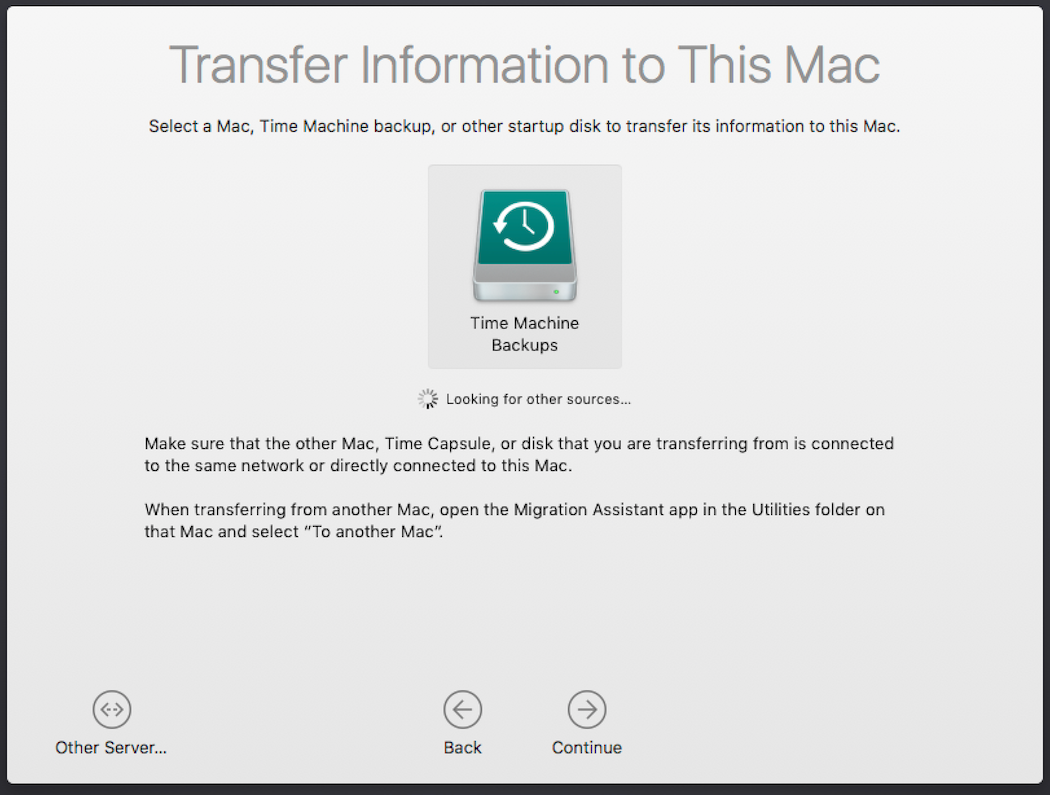
STEP 22 - Select the USB Hard Drive
- The "Time Machine Backups" should be the only item and be selected.
- Press "Continue".
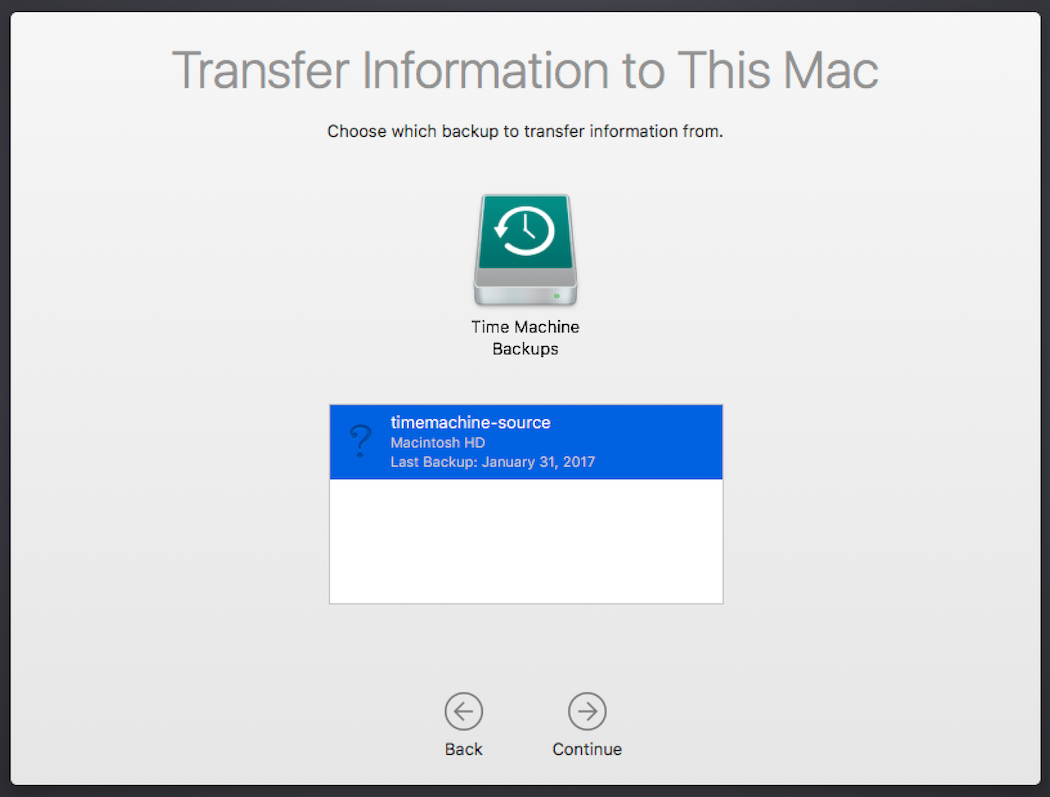
STEP 23 - Select the Proper Backup to Restore
NOTE: The backup listed will be named for your former computer. If you happened to have more than one backup on the Backblaze USB Hard Drive, all of them will be listed.
- Select the backup you wish to restore to the current computer.
- Press "Continue".
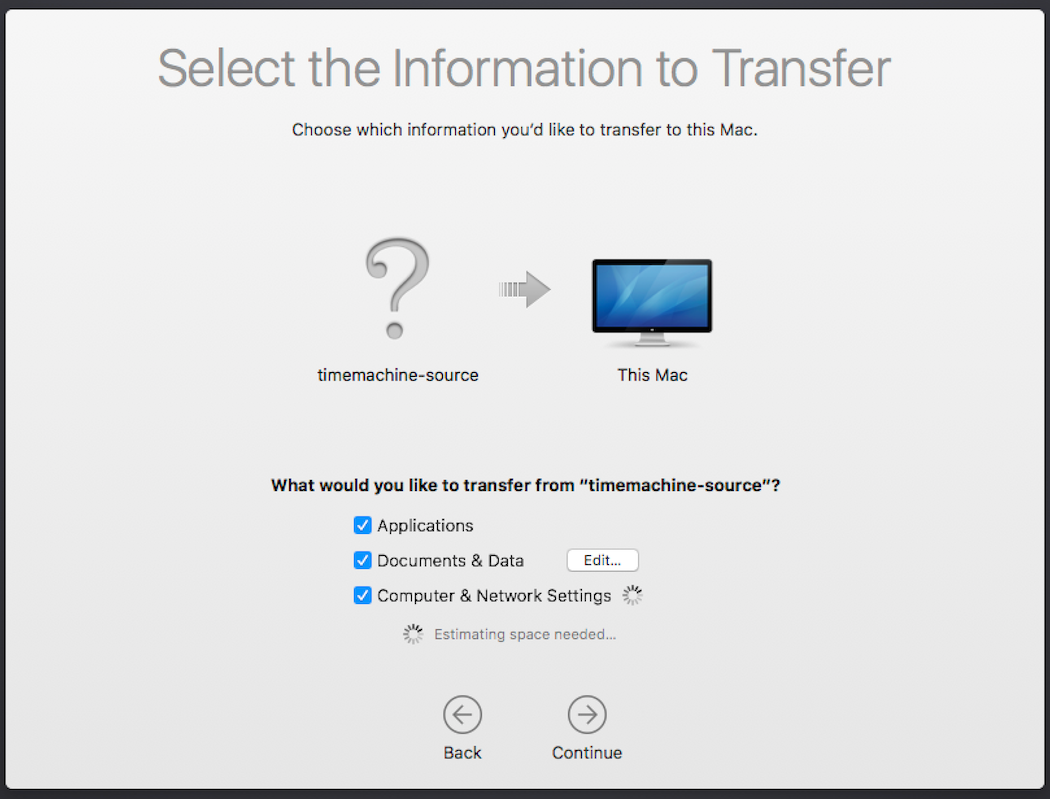
STEP 24 - Select the Files you Wish to Restore
NOTE: You can select to restore Applications, Documents & Data, and Computer & Network Settings, or any combination of the three.
- Select the item(s) you wish to restore.
- Click "Continue".
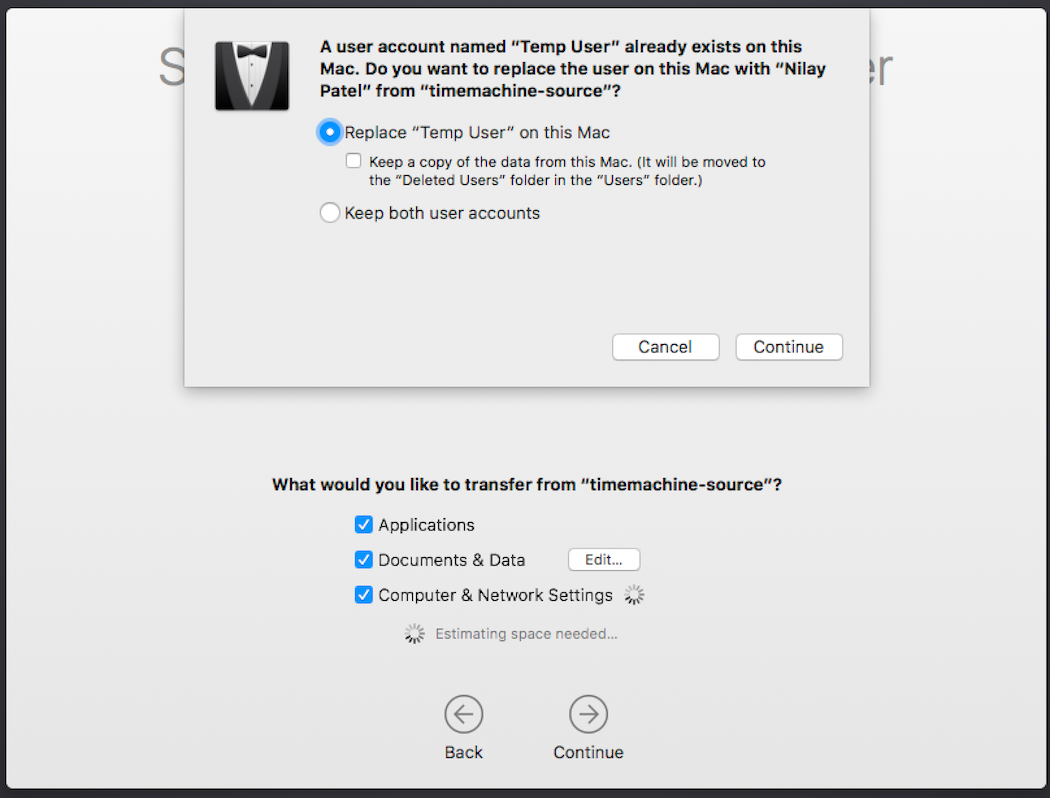
STEP 25 - Delete Your Temporary Account
NOTE: The temporary account you created in Step 7 should be removed as it is only needed to complete the restore. Doing this will allow the account(s) on your old computer to be installed on the new computer.
- Select "Replace 'Temp User' on this Mac".
- Click "Continue".
STEP 26 - The Restore is in Process
- The restore from your Time Machine backup to your "new" machine will begin.
- Shortly after the restore starts the screen will display the estimated "Time Remaining".
- Depending on the size of the restore, it can take from a few minutes to an hour or longer.

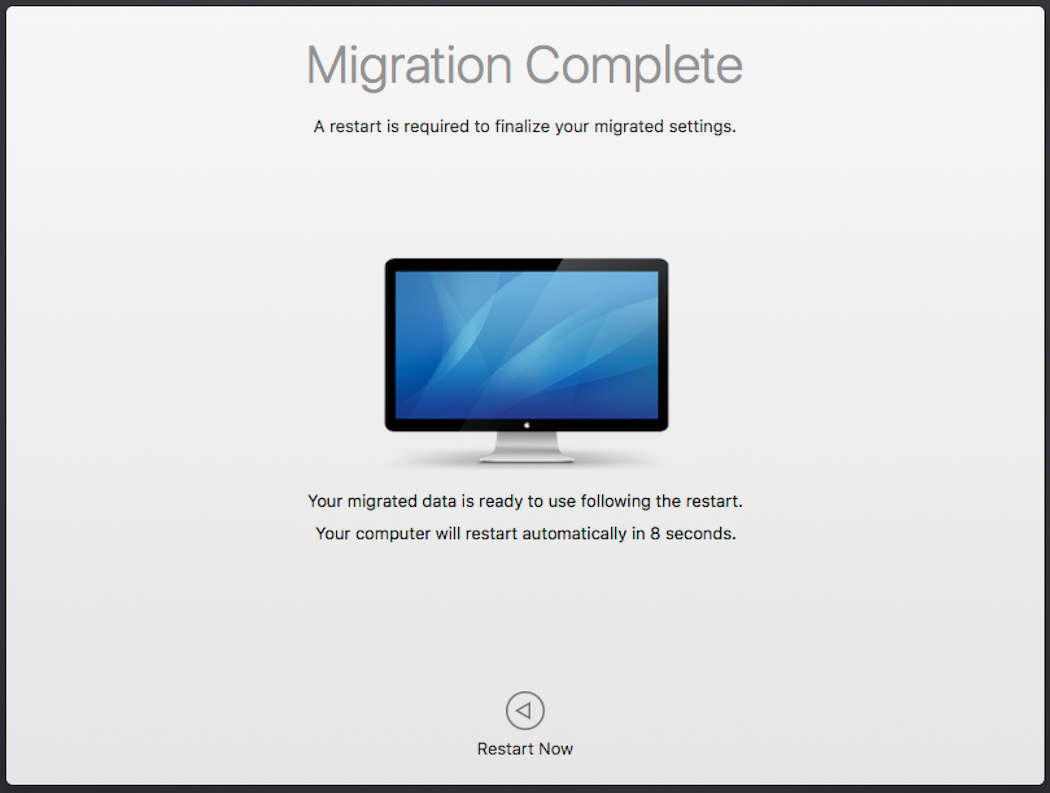
STEP 27 - The Migration is Almost Complete
- At the end of Migration process, you will be asked to restart your computer.
- You can do click "Restart Now" or just wait until the computer restarts automatically.
- This could happen more than once.
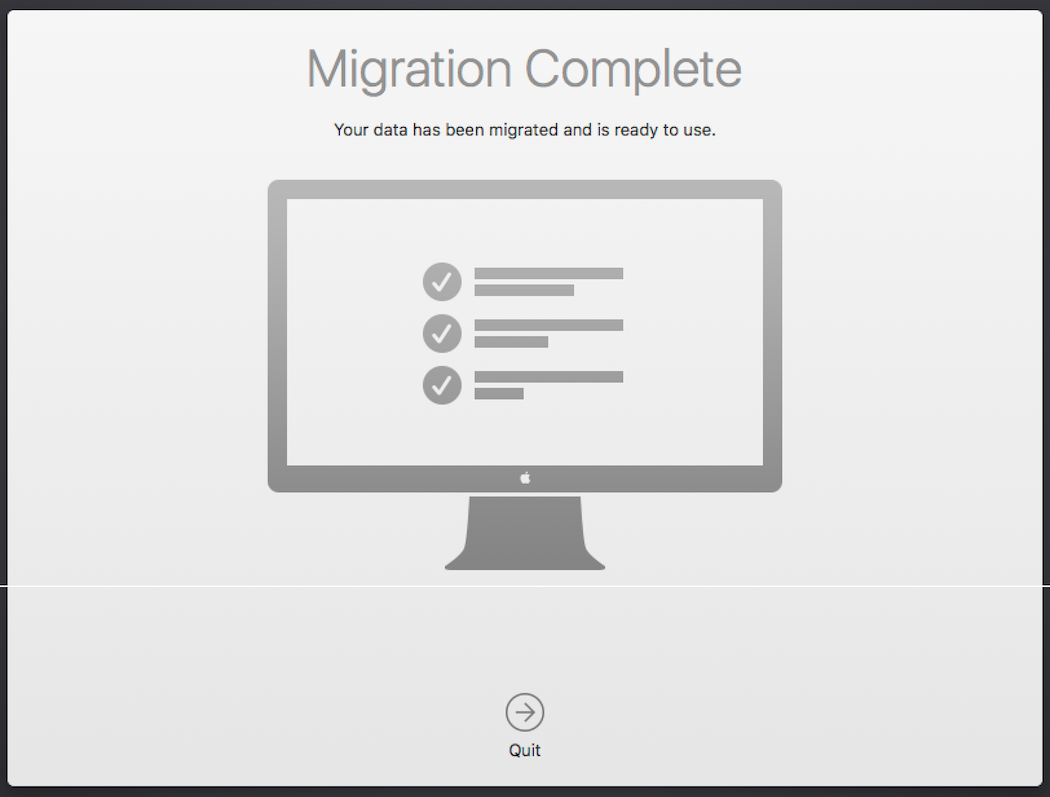
STEP 28 - Complete the Migration
- After the reboot(s) the migration is complete.
- Click "Quit" to exit the Migration Assistant.
STEP 29 - Finished
- The home screen appears, your computer has been restored.
- Eject the Backblaze USB Hard Drive.
- You're ready to go back to work.
Articles in this section
- How to Upload Files to B2 Using Fireball
- How to find Unfinished Large Files in your account
- B2 Mobile App Overview - iOS
- B2 Mobile App Overview - Android
- Getting Started with Instant Recovery in Any Cloud - DR Planning with Veeam and phoenixNAP
- How to setup Vultr Compute with Backblaze B2
- B2 & AWS CLI User Guide
- Guide to using Backblaze Fireball with Iconik Internet Storage Gateway (ISG)
- How to order a Snapshot Drive
- Why do I need to verify my email address to create a public bucket?