Note: As of version 12, FreeNAS and TrueNAS have now merged, and this guide has been updated to show the current screens in this combined version, as well as new options available.
Introduction
FreeNAS is a free and open-source network-attached storage operating system based on FreeBSD and the OpenZFS file system. With Backblaze B2 and FreeNAS, all your data can be safely backed up to the cloud.
FreeNAS can be configured with B2 Cloud Storage by following the steps below.
Guide
1) Add Backblaze B2 Cloud Storage account. Select System, then choose Cloud Credentials
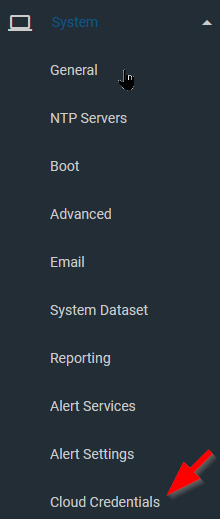
2) Click Add
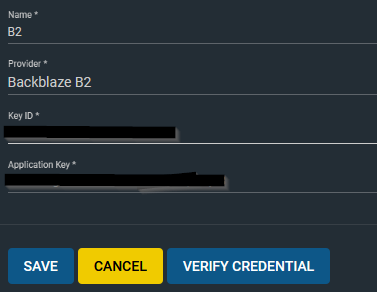
- Enter a profile name (Ex. B2)
- Change cloud provider to be Backblaze B2
- Fill in the form with your B2 credentials
- Click Verify Credential
- Click Save
3) Add a Cloud Sync Task, select Tasks, then click on Cloud Sync Tasks
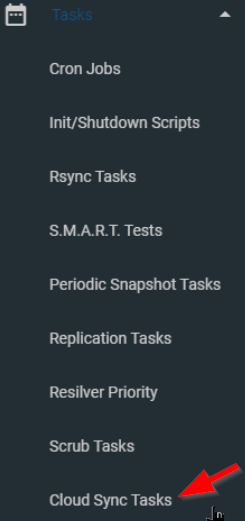
4) Click Add to add a new Sync Task.
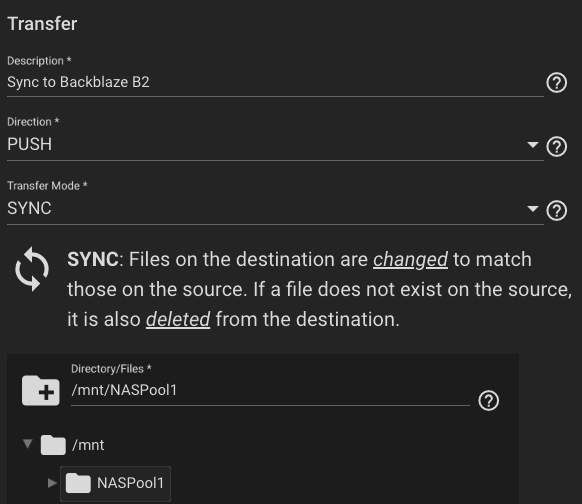
Within the Transfer window...
-
- Add a Description
- Pick Push for Direction to copy files to your B2 bucket
- Set Transfer mode to Sync
- Browse to the local Path of the folder you want to sync to B2
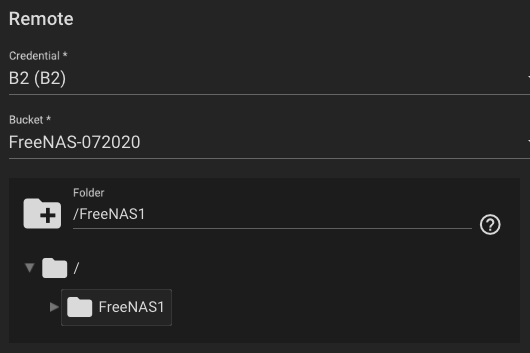
Within Remote window
-
- Pick your Cloud Credential from above for Provider (Backblaze B2)
- Pick the bucket the sync is pushing to for Backblaze B2 Buckets, and 0ptionally create a folder in the Bucket for this Sync task.
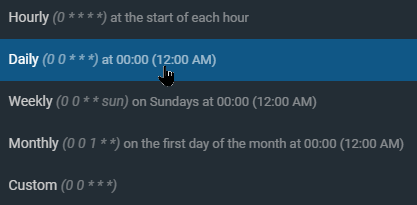
5) Pick the Task Scheduling Options which match your needs, the default being Daily at midnight.

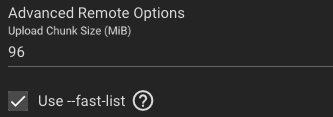
6) Advanced Remote Options
- Enter an Upload Chunk Size in MB, or accept the default of 96.
- If you have a fast internet connection and are syncing large files, increasing this size will give you better performance.
- Enable Fast-list
- This will reduce the number of transactions, and potentially increase your transfer speed, but will use more RAM.
7) Optionally enable client-side encryption
If you want to encrypt your data prior to uploading it to Backblaze, you can enable Remote Encryption.
-
- Enter an Encryption Password. This should be a long password, with upper/lowercase letters and include numbers and ideally special characters.
- Enter an Encryption Salt. This should be a random string of characters and is added to the password to strengthen
- Note: Store both the Encryption Password and the Encryption Salt in a password vault or other secure location. You can not retrieve your data without both the password and the salt.

8) The default number of threads to use for file transfers is 4. The faster your internet connection, the more increasing this value will help your file transfer speed. For most people, setting this to 10-20 threads will be more than enough.

Click Save, and your sync task is now complete.
Articles in this section
- Quickstart Guide for Veeam 12 Direct-to-Cloud Backups to Backblaze B2 with Immutability
- Quickstart Guide for Acronis CyberProtect and Backblaze B2 Cloud Storage
- Quickstart guide for SFTPCloud
- Quickstart Guide for Veritas NetBackup and Backblaze B2 Cloud Storage
- Quickstart Guide for Offshoot and Backblaze B2
- Quickstart Guide for Files.com and Backblaze B2 Cloud Storage
- Quickstart Guide for Encoding.com and Backblaze B2 Cloud Storage
- Quickstart Guide for Mountain Duck and B2 Cloud Storage
- Quickstart Guide for Microsoft 365 Backup with MSP360 and Backblaze B2 (Multiple Instances)
- Quickstart Guide for Microsoft 365 Backup with MSP360 and Backblaze B2 (Single Instance)