Introduction
Filezilla Pro is an FTP tool that supports B2 Cloud Storage and has been tested by Backblaze. Using Filezilla Pro you can quickly browse and transfer data in and out of your B2 Bucket.
You can download Filezilla Pro from their webpage here: https://filezillapro.com/
Guide
Below are the steps for configuring and optimizing Filezilla Pro (Windows)
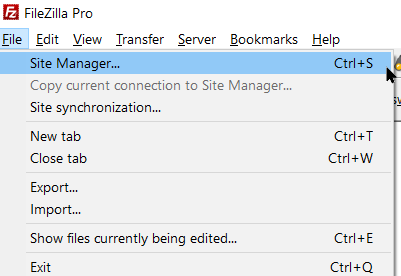
1) In the menu bar, click on File -> Site Manager
2) Then click on New Site

On the left-hand side, change the name New Site to a descriptive name for this connection (ex. Backblaze B2)
Select Backblaze B2 as the protocol, enter 443 for the Port, and then enter your B2 keyID for the Key ID, and your appKey for the Application Key. Then click OK. (For more information about Application Keys, Key IDs, and how to manage them on your Backblaze account, please view this article.)
3) Now go back to File -> Site Manager
Double-click on Backblaze B2 to be connected to your account.
On the left side, you will see your local files, and on the right side, your list of buckets in your Backblaze B2 account.
If you want to create a new bucket, right click on the right side and choose “Create directory”, and then enter the name for your new bucket.

Note: All bucket names must be globally unique, not just unique to your account.
To transfer files, you have two choices.
- Method 1: Simply drag and drop files, to either upload or download them from B2.
- Method 2: To Upload follow these steps.
- On the right side of the screen, navigate to the directory with the files you want to upload to B2.
- Select the files that you want to transfer. Use the SHIFT key to select a block of files; use the CTRL key (Windows) or CMD key (MacOS) to select multiple non-sequential files.
- Right-click (Windows) or CTRL-click (MacOS) on the selected files and click on Upload.
The files will then start immediately uploading to B2. To download, perform the same file selection steps on the right side of the screen, and then click on Download.
Optional Settings for Increased Reliability and Speed.
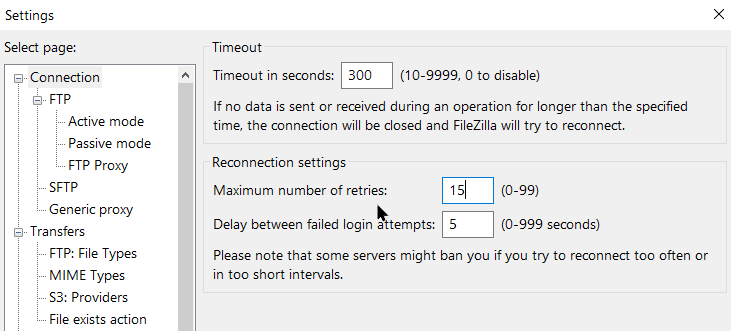
Internet connections can sometimes be unreliable, and this especially causes problems when uploading large files. When transferring a large file, it is broken down into multiple parts. If you have problems when transferring large files, it could be that just one of the parts had a transfer issue, but then the whole file transfer will fail. To help overcome this, increase the Timeout and number of retries.
In the menu bar, click on Edit -> Settings, and then click on Connection.
Increase the Timeout to 300 seconds, and the Maximum number of retries to 15.
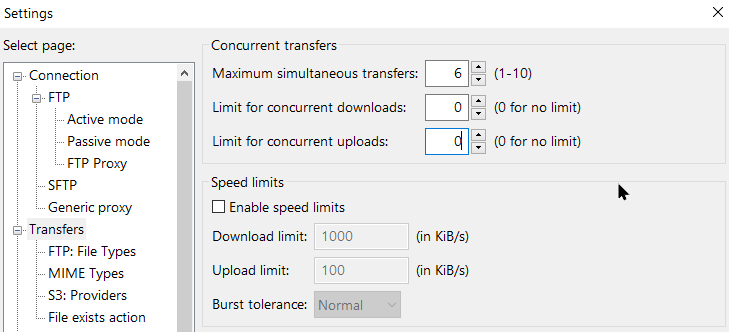
If you have a fast internet connection and want to be able to transfer multiple files at the same time, in the Settings menu, click on Transfers.
By default, you can only upload one file at a time, and also only download one file at a time, even though the Maximum simultaneous transfers is set to 6. To increase the number of files you can transfer simultaneously in both directions, change the Limit for concurrent downloads and uploads to both be 0. Then you can adjust the total
Articles in this section
- Quickstart Guide for Veeam 12 Direct-to-Cloud Backups to Backblaze B2 with Immutability
- Quickstart Guide for Acronis CyberProtect and Backblaze B2 Cloud Storage
- Quickstart guide for SFTPCloud
- Quickstart Guide for Veritas NetBackup and Backblaze B2 Cloud Storage
- Quickstart Guide for Offshoot and Backblaze B2
- Quickstart Guide for Files.com and Backblaze B2 Cloud Storage
- Quickstart Guide for Encoding.com and Backblaze B2 Cloud Storage
- Quickstart Guide for Mountain Duck and B2 Cloud Storage
- Quickstart Guide for Microsoft 365 Backup with MSP360 and Backblaze B2 (Multiple Instances)
- Quickstart Guide for Microsoft 365 Backup with MSP360 and Backblaze B2 (Single Instance)