
This guide outlines how to store your Time Machine backup on your Synology NAS device and have that backup automatically sync to Backblaze B2 Cloud storage. This document will show you how to set up your configuration so the files on your Mac can be automatically backed up locally to your Synology NAS, and then synced off-site to your Backblaze B2 account.
This guide focuses on the Backup process. A second companion Guide, "How to restore your Time Machine backup from B2" explains how to Restore your Time Machine data from Backblaze B2.
This guide assumes you have the following:
- A Mac computer with MacOS 10.9 and above.
- Working knowledge of the Time Machine backup service on your Mac.
- A Synology NAS device with at least DSM 6.0 installed.
- A user account on the Synology NAS device that has the ability to download, install, and configure the Cloud Sync package.
- A Backblaze B2 Cloud Storage account and the login credentials for that account.
NOTE: The set-up process below is 16 steps. Please follow the steps in order and leave yourself enough time to complete them. If you need to stop in the middle, complete steps 1-9 first, then proceed with the remaining steps at a later time.
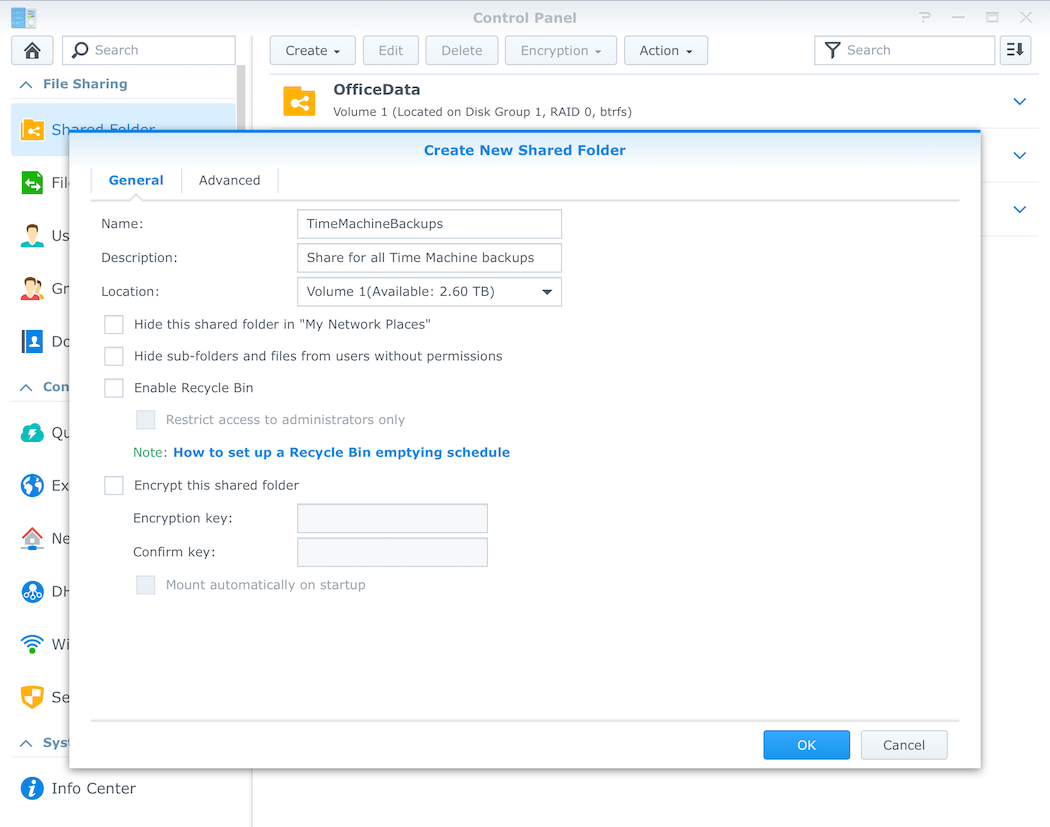
STEP 1 - Create a Time Machine backup share on your Synology NAS
- On your Synology NAS, open the Synology Control Panel and click on "Shared Folder”.
- Enter the “Name”, “Description”, and “Location” of your Share.
NOTE: We will use the share “Name” of “TimeMachineBackups”, your name can/will be different.
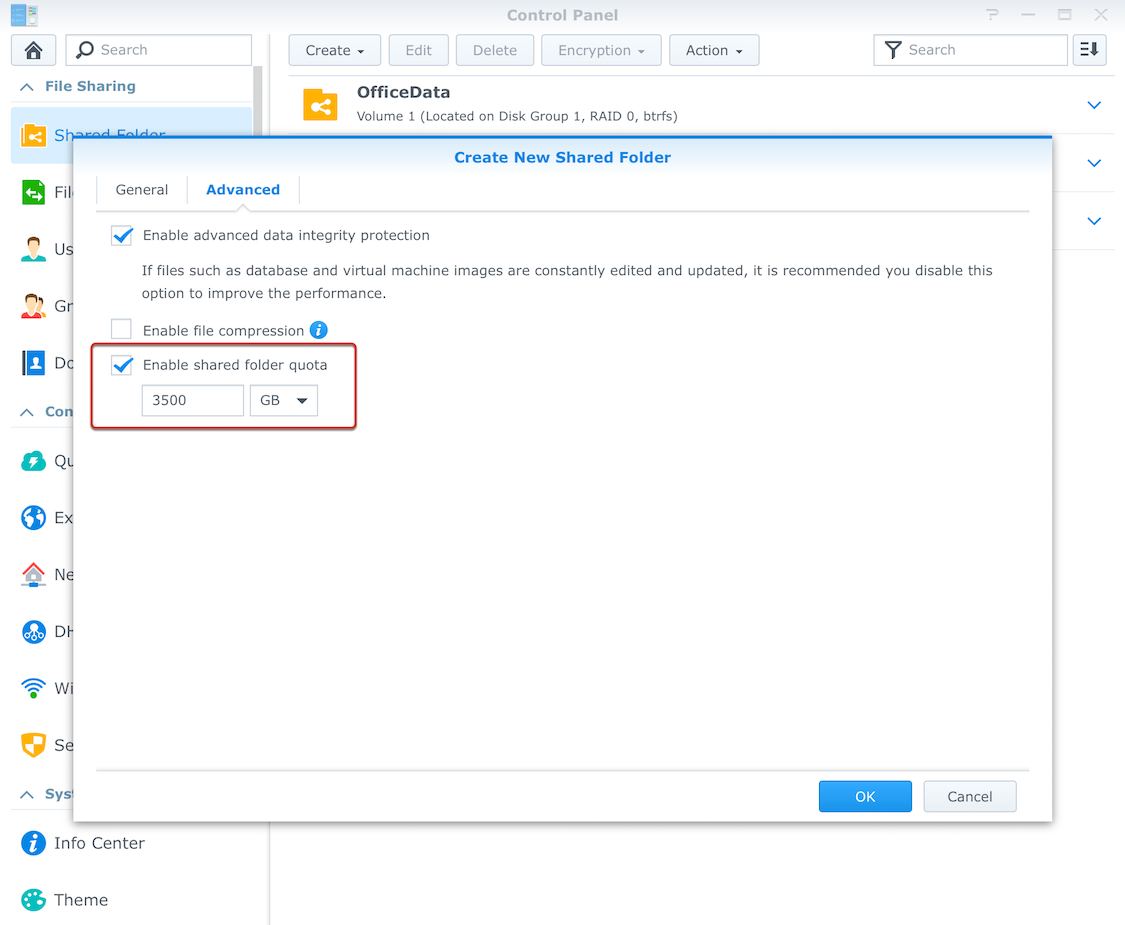
STEP 2 - Set Share Quota (Optional Step)
NOTE: This step is optional, but if you want to be able to restore a Time Machine backup via the Backblaze B2 USB Snapshot feature, the Time Machine backup can not be greater than 3.5TB. Setting a quota insures Time Machine will delete older versions when the backup share is close to being full. Setting the Share Quota in this manner is equivalent to using Time Machine with a 4TB external hard drive connected to your Mac.
- In the “Advanced” tab, “Enable shared folder quota” and set it to “3500” and “GB”.
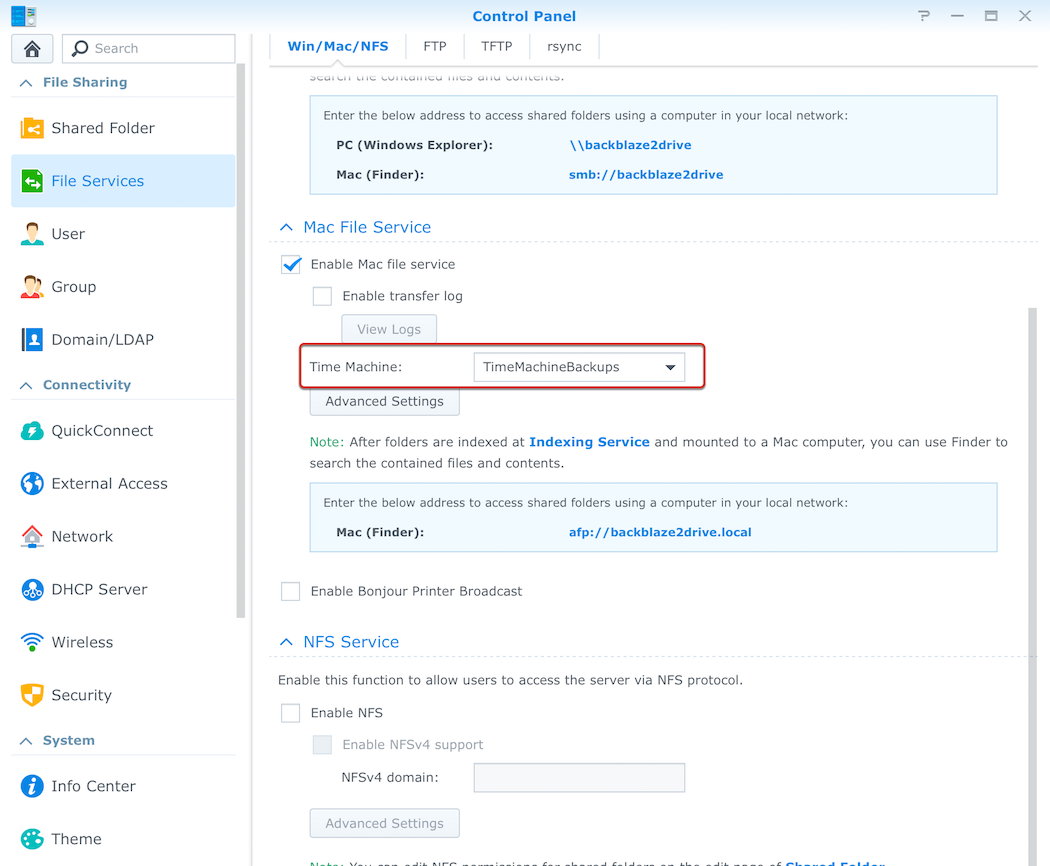
STEP 3 - Enable Mac File Service
- After creating the share, open the File Services section in the control panel.
- Select the “Enable the Mac File Service” option and select your new "TimeMachineBackups" share under the “Time Machine” selection
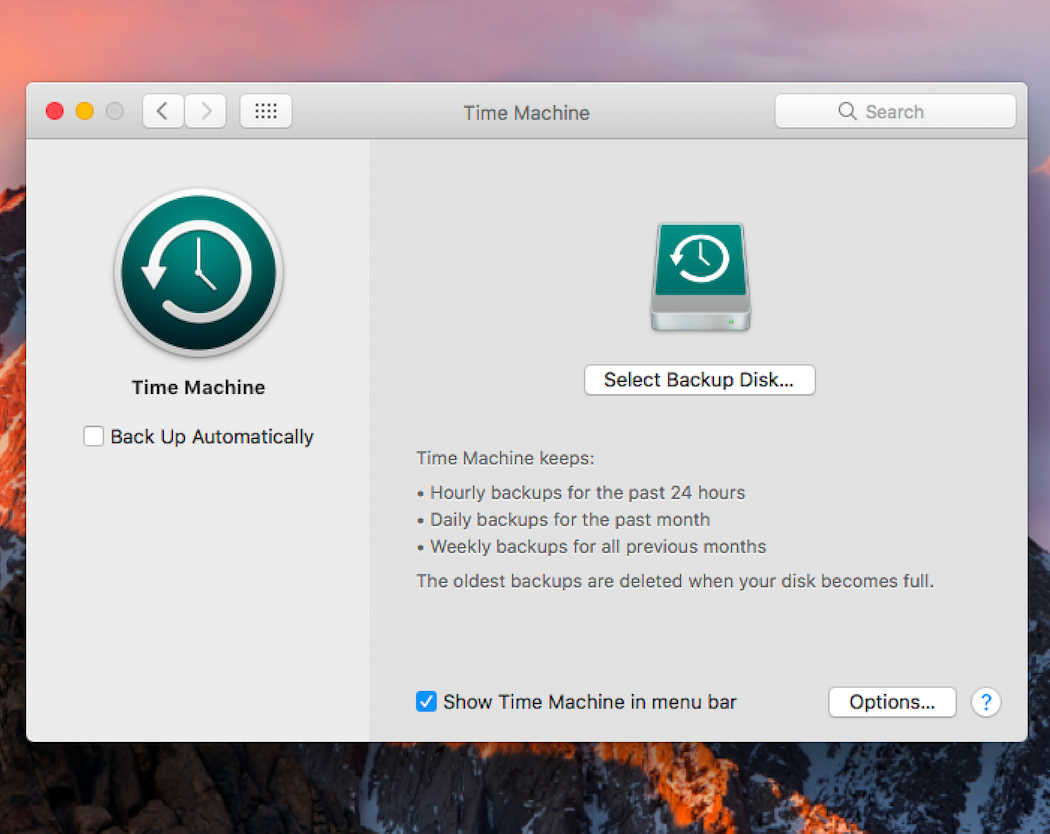
STEP 4 - Configure Time Machine on your Mac
- On the Mac you wish to back up, open the Time Machine control panel item.
- Click “Select Backup Disk”.
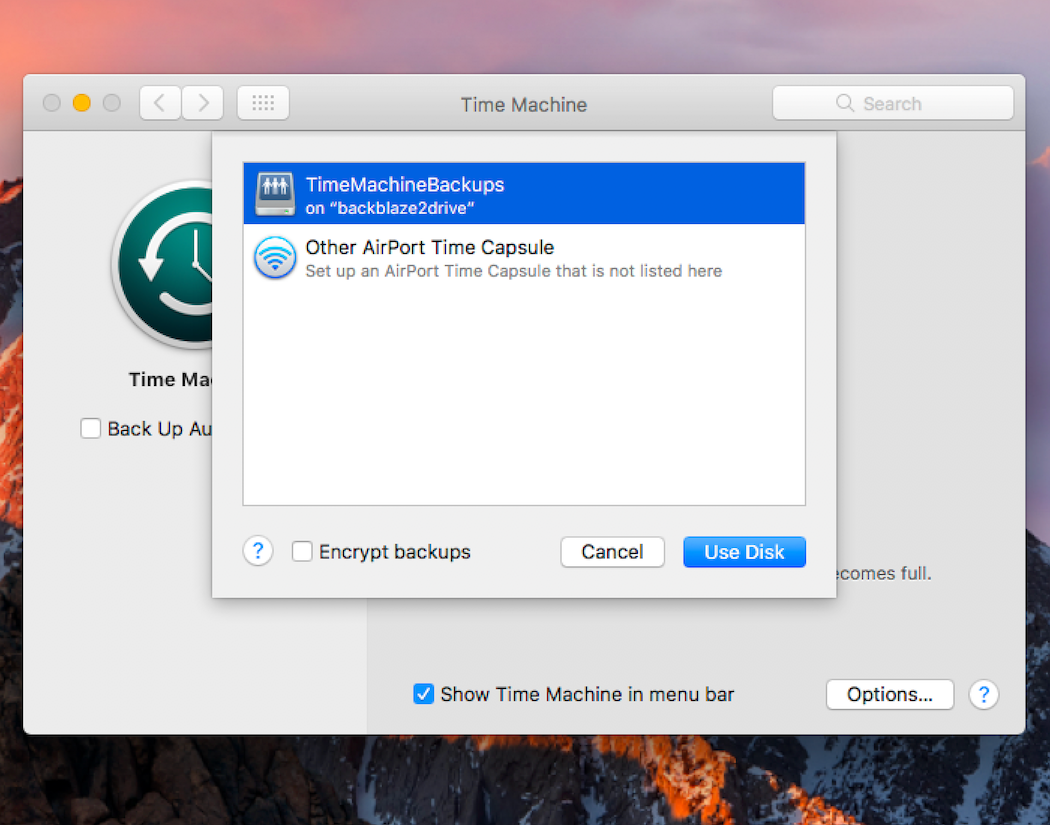
STEP 5 - Select your shared backup
- Select your Time Machine backup shared folder on your Synology NAS. In this example, that is "TimeMachineBackups”.
NOTE: If you do not see your Synology backup share listed, most likely you have a network or configuration issue from your Mac and the Synology NAS device. Consult the appropriate documentation or online help to fix the issue.
STEP 6 - Enter your Synology credentials
- Select Registered User (if not selected)
- Enter your Synology NAS Username and Password
- Press “Connect”

STEP 7 - Confirm the Time Machine backup is working properly
- If everything was done correctly, in a couple of minutes the Time Machine screen will show your backups are working as seen below.
- The name of your Synology share, in our example “TimeMachineBackups,” will be the drive listed as the Time Machine backup drive.
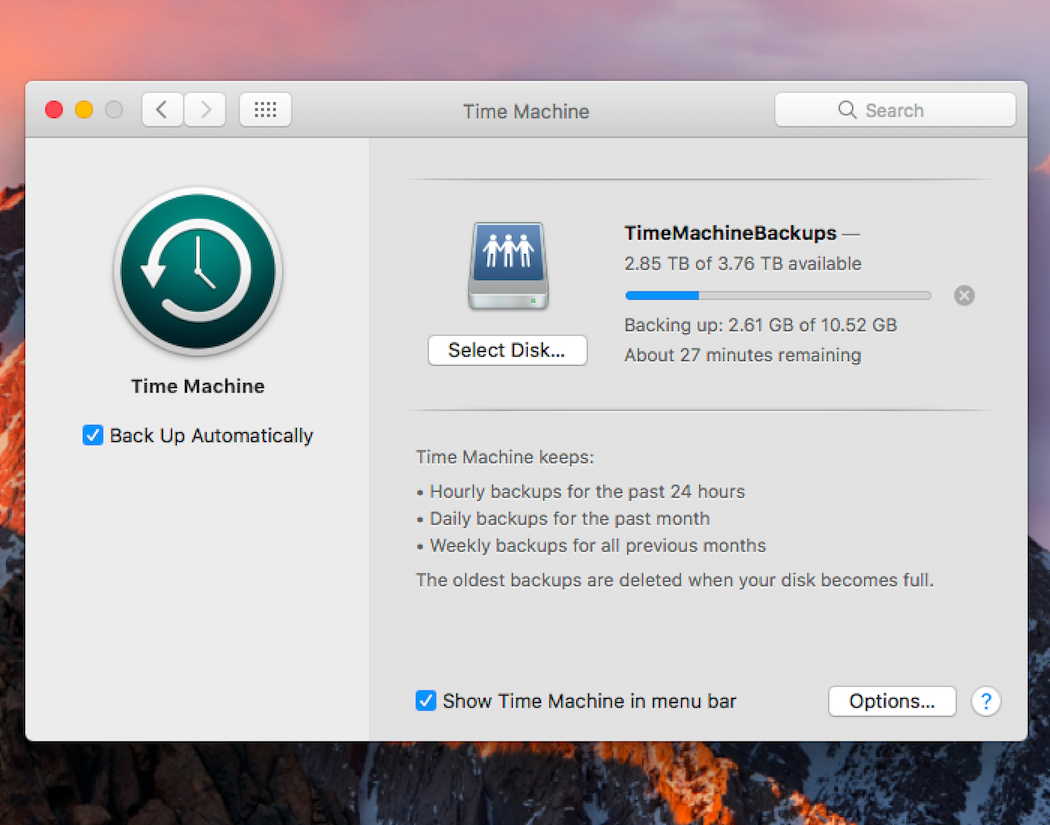
STEP 8 - Your initial backup is complete
- Once the initial backup of your Time Machine backup to your Synology NAS has completed, you’ll see a screen similar to the one below.
NOTE: You are not finished, but after Step 8 is a good place to stop you need a break. Restart with Step 9.

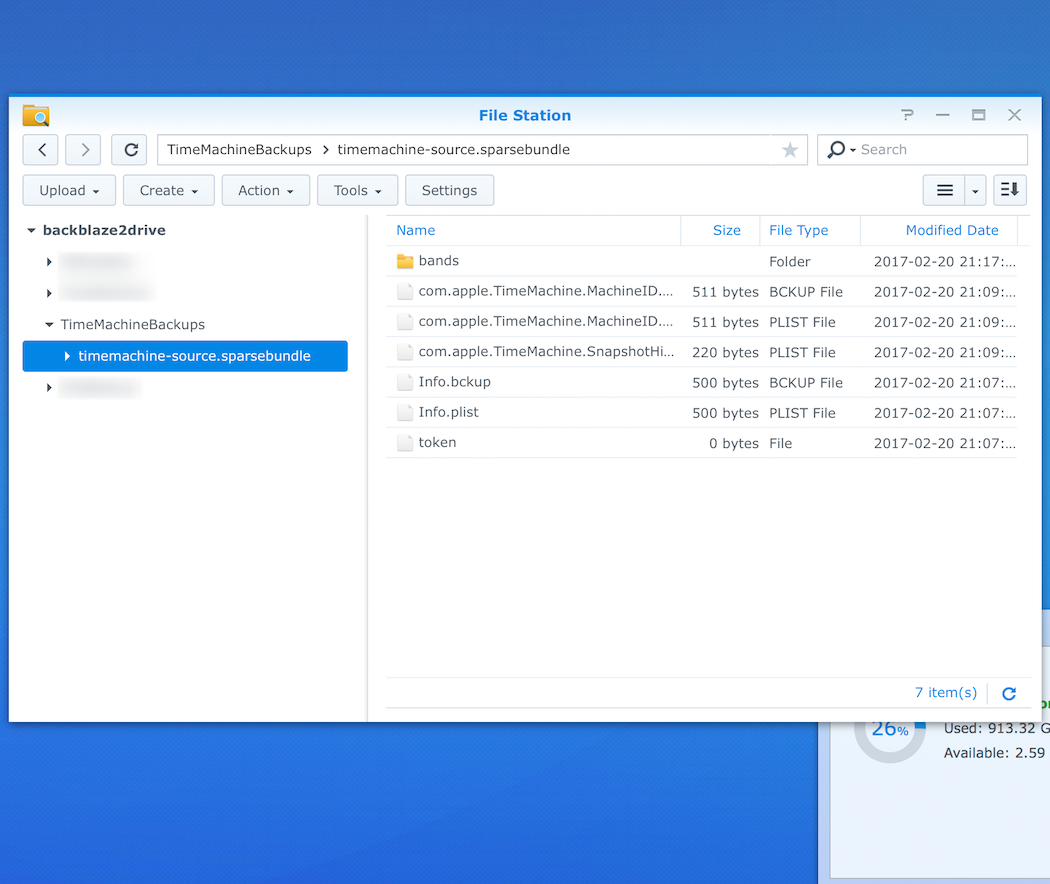
STEP 9 - Confirm your Time Machine backup is on the Synology NAS
NOTE: We will use the share name of “TimeMachineBackups”, your name can/will be different.
- Log in to your Synology NAS device and open “File Station”.
- Open the Time Machine share in our case “TimeMachineBackups”
- Observe that the “.sparsebundle” file is there and has content. If so, then your Time Machine data is on the Synology NAS.
At this point you have successfully set up your Synology NAS to host your Time Machine backup. What follows is how to sync the Time Machine backup to Backblaze B2. Once configured this will happen automatically, then you will have a local and a cloud-based copy of your Time Machine backup.
STEP 10 - Configure Cloud Sync and Backblaze B2
Now that the Time Machine backup is on the Synology NAS, what follows are the steps to “sync” the backup to Backblaze B2.
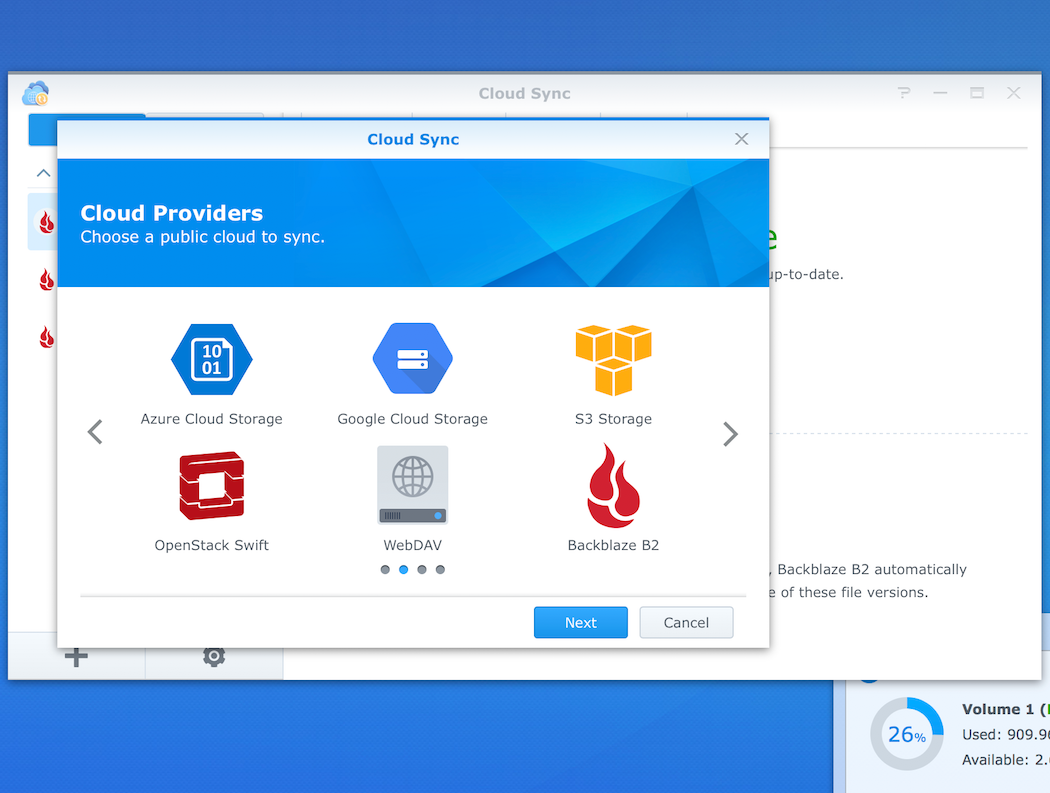
- Open the Cloud Sync package on the Synology NAS. DSM version 6.0 of higher is required.
- Locate and select Backblaze B2 as the Cloud Sync destination.
- Press “Next”
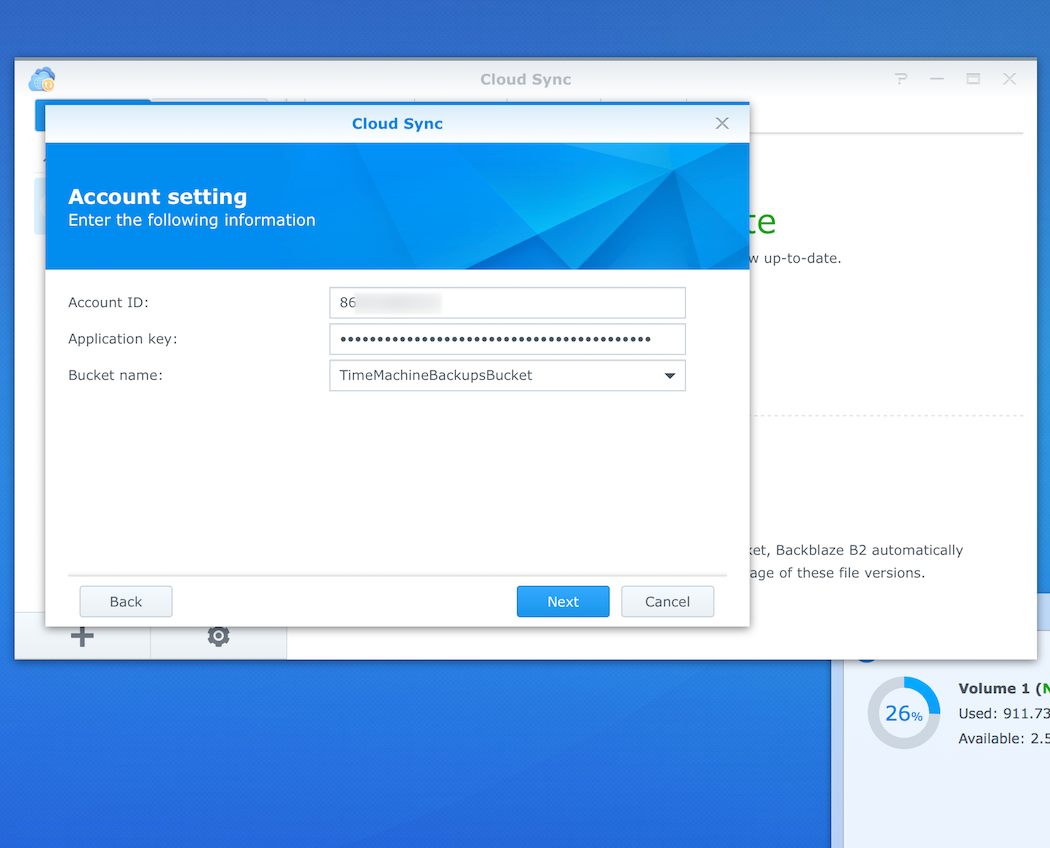
STEP 11 - Backblaze B2 Account Settings
Note: The following steps assume you have your B2 Account ID, Application Key and Bucket Name handy. If you are missing this information, please obtain it before proceeding.
- After selecting B2 as your destination for Cloud Sync, enter your B2 Account ID, Application Key, and a Bucket Name as shown below.
- Press “Next”.
STEP 12 - Configure Cloud Sync
- Create and enter a “connection name”.
- Enter the Share folder name as the “Local Path”. Remember to add the leading “/”. In our example, the share name is “TimeMachineBackups”.
- Set the “Sync direction” to “Upload local change only”.
- All other settings are as shown.
- Press “Next” to continue.

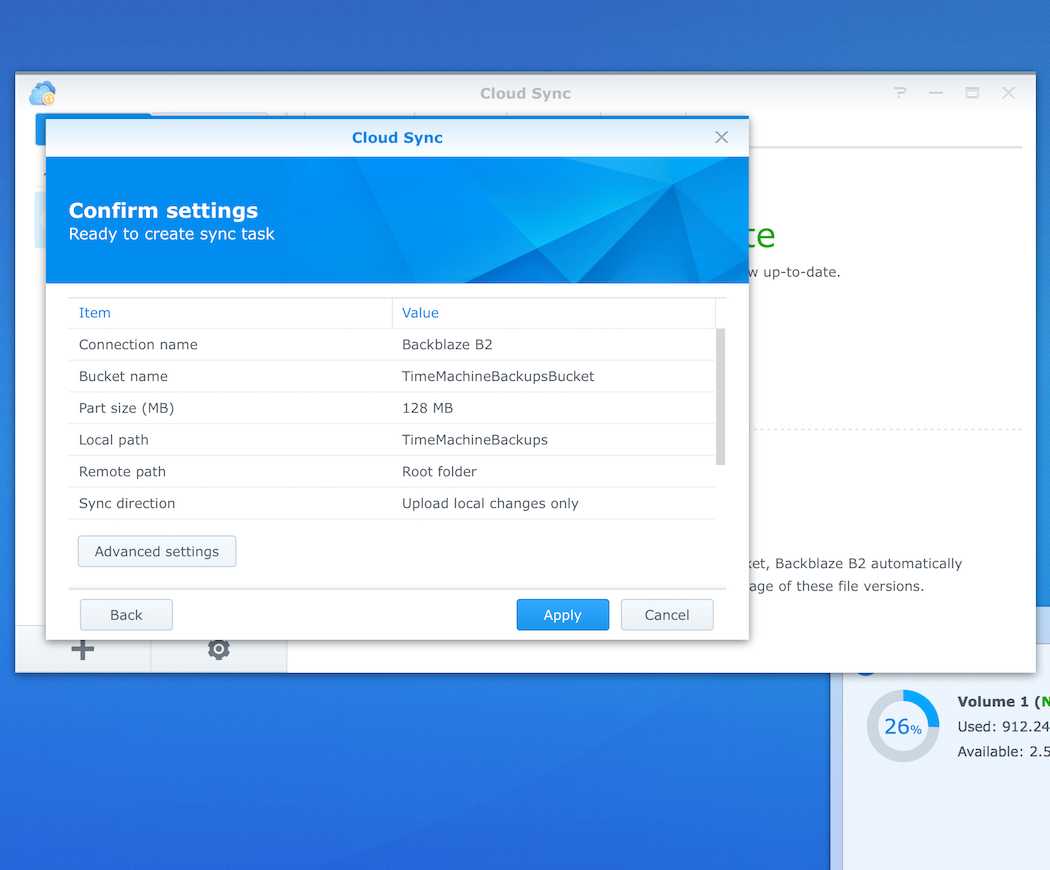
STEP 13 - Confirm and Apply Cloud Sync Settings
- Review the settings carefully. If there are any errors, use the Back” button to fix them.
- Press the “Apply” button only when you are ready to start the sync operation.
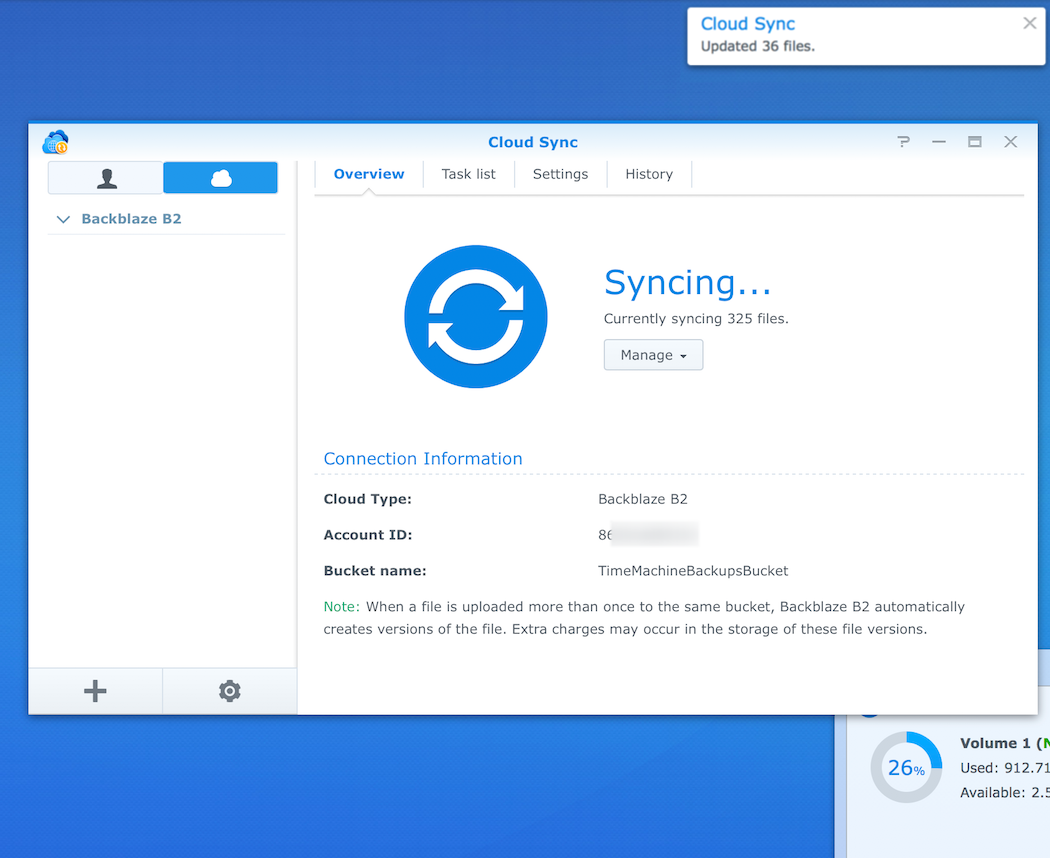
STEP 14 - The Time Machine Sync Begins
- The Time Machine backup is now being synced to Backblaze B2.
- This can take a few minutes or much longer depending on the size of the initial Time Machine backup.
- Each Time Machine backup is updated, the changes will be done on the Synology NAS and then synced automatically to Backblaze B2.
- You can close your Synology NAS device.
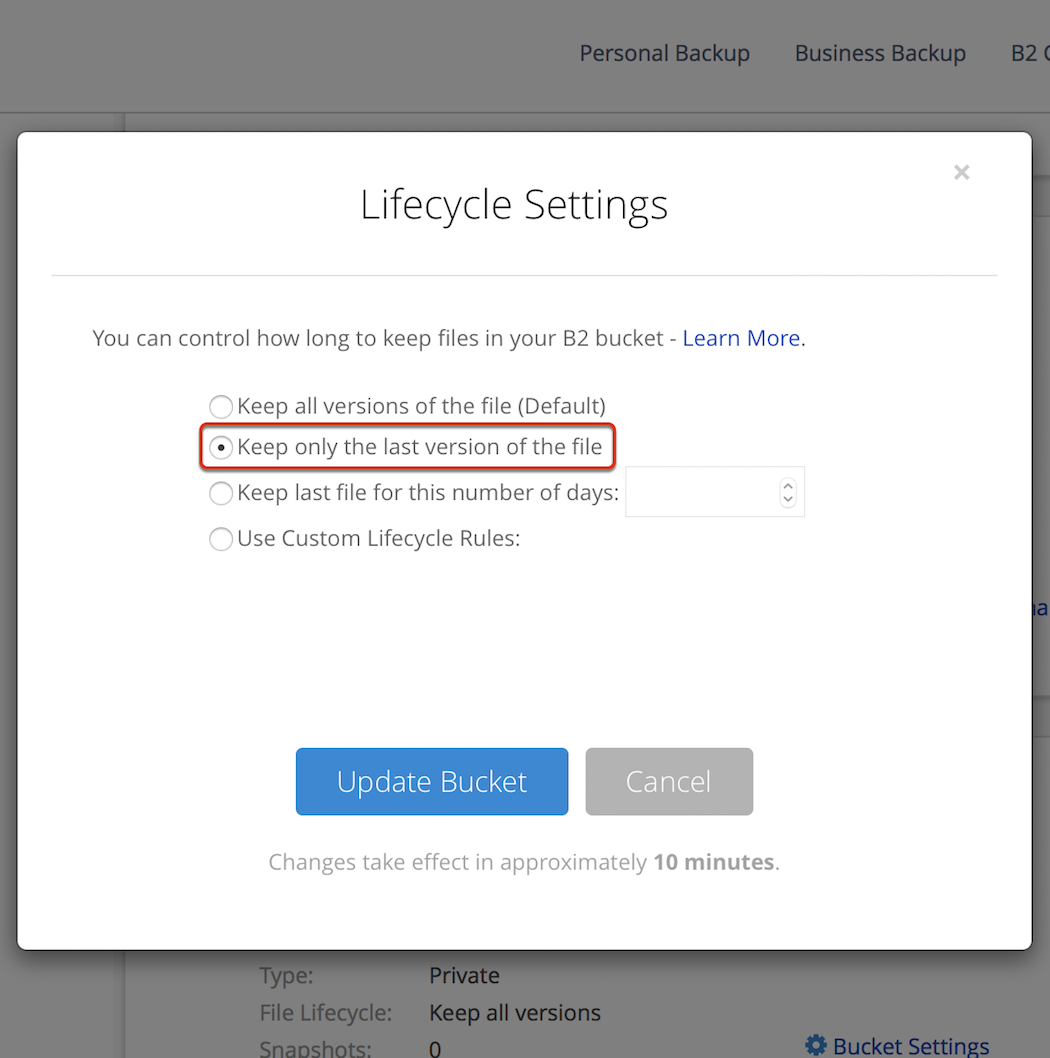
STEP 15 - Keep ONLY the Most Recent B2 Backup
NOTE: Your Time Machine backup file is one file containing all of the Time Machine versions of the data from your Mac computer. Therefore you need to Backblaze B2 to only keep the most recent version of the Time Machine backup file. Keeping multiple versions of this file can increase your B2 storage costs.
- Log in to your Backblaze B2 account
- Select the “Bucket” containing the Time Machine backup from your Synology NAS.
- Click “Lifecycle Settings” as shown.

STEP 16 - Set B2 Lifecycle Settings
NOTE: The default setting for all buckets is to keep all versions of a file, therefore you must change this setting or you will have a new Time Machine backup file each time your Synology NAS syncs with Backblaze B2.
- Select the “Keep only the last version of the file” option
- Select “Update Bucket”
- You can now log out of B2
You are finished. As you update files on your Mac, they should be backed up to your Time Machine backup on your Synology NAS and then synced to Backblaze B2. After a few days, we recommend you check your Synology NAS and B2 account to make sure things are working properly.
Articles in this section
- Quickstart Guide for Veeam 12 Direct-to-Cloud Backups to Backblaze B2 with Immutability
- Quickstart Guide for Acronis CyberProtect and Backblaze B2 Cloud Storage
- Quickstart guide for SFTPCloud
- Quickstart Guide for Veritas NetBackup and Backblaze B2 Cloud Storage
- Quickstart Guide for Offshoot and Backblaze B2
- Quickstart Guide for Files.com and Backblaze B2 Cloud Storage
- Quickstart Guide for Encoding.com and Backblaze B2 Cloud Storage
- Quickstart Guide for Mountain Duck and B2 Cloud Storage
- Quickstart Guide for Microsoft 365 Backup with MSP360 and Backblaze B2 (Multiple Instances)
- Quickstart Guide for Microsoft 365 Backup with MSP360 and Backblaze B2 (Single Instance)